In the digital world, image quality plays a crucial role in various applications, including photography, video production, graphic design, and online content creation. A high-resolution image is essential for maintaining sharpness and clarity, especially when printing or displaying on large screens.
However, there are times when we need to enhance the resolution of a low-quality image without losing too much detail.
This guide explores different methods to improve image resolution effectively, so without further ado, here's what you need to know to make completing this task a breeze.
Let's get into it.
How Can I Enhance the Quality of a Low-Resolution Image
There are several techniques available to enhance the quality of a low-resolution image. Some of these methods involve software tools, while others require manual adjustments. Below are some of the most effective ways:
- Using AI-Based Image Upscalers
Modern AI-powered tools such as Topaz Gigapixel AI, Adobe Photoshop’s Super Resolution, and Let’s Enhance use deep learning algorithms to upscale images while preserving detail and minimizing artifacts. - Photoshop’s Image Size Adjustment
Adobe Photoshop provides a manual way to increase resolution by adjusting the image size. By using the “Preserve Details 2.0” resampling method, users can enhance sharpness while reducing noise. - Online Image Enhancement Tools
Websites like UpscalePics, Waifu2x, and Vance AI allow users to upload images and increase their resolution without needing complex software. - Using Sharpening Filters
After increasing the resolution, applying sharpening filters in Photoshop or GIMP can help bring back some of the lost details. - Enhancing Image With Noise Reduction
High-resolution images may sometimes introduce noise. Using noise reduction tools in Lightroom, Photoshop, or dedicated plug-ins can help maintain a clean look. - Vectorization for Graphics and Logos
For logos and illustrations, converting raster images to vector format using Adobe Illustrator or Inkscape can ensure quality remains intact at any scale.
Increase Resolution of an Image With BCC+ UpRes ML
If you're someone who frequently needs to upscale images or video, it's best to find a tool that's easy to use but also versatile.
In this section, we'll tell you more about the BCC+ UpRes ML tool, which is part of the Continuum by Boris FX.

Continuum is a collection of hundreds of tools and solutions that can take your videos and images to the next level. It features hundreds of transitions, filters, tools, and presets that you can use not in one specific software, but in almost every popular editing program available on the market.
If you download Continuum, you can choose to install it for Adobe Premiere Pro, Adobe After Effects, Avid Media Composer, DaVinci Resolve, VEGAS Pro, and many other editing programs, meaning you can take advantage of everything available in it without having to get used to a whole new working environment.
That said, BCC+ UpRes ML is part of this pack, and in this section, we'll show you how to use it to enhance image quality.
Continuum is a paid plug-in, but there is a free version available that you can download. You can use the free version to its full potential, except your content will be watermarked until you decide to upgrade to the paid, licensed version.
-
Step 1: Choose Software to Pair Continuum With
As mentioned earlier, Continuum is versatile and can be used with many different editing programs. For this specific example, we'll be using its tools in Adobe Premiere Pro.
Despite Premiere Pro being a video editing tool, we can still use it to enhance photo resolution and video resolution.
Please note that the steps will be very similar regardless of which software you choose, with the only difference being the other software's slightly different user interface.
Note: In host apps like Avid Media Composer, VEGAS, and Resolve, you'll need to turn off their automatic resizing of clips to fit the frame.
-
Step 2: Launch Your Software of Choice and Create a Project
Once you choose your working environment, your next step should be to launch the software and start a new project.
In our example, using Premiere Pro, this is done on the very first home screen you see upon launching it.
Choose your preferred project settings, name the project, and finalize the process. For the resolution settings, select the size you would like to upres your clip to. When done, move on to the next step.
-
Step 3: Import Media and Create a Timeline/Sequence
Once you've created your project, it's time to import media. This can be a blurry image file that is lower resolution you want to try improving by upscaling or a video. Again, when creating your project, make sure to select your target resolution.
Head over to the "Project" tab and click the blue "Import media" button.
Once you import your files, you will see them in the same Project tab. From there, simply drag and drop the file(s) onto the timeline area.
When done, you should have a sequence ready to work on.
-
Step 4: Apply BCC UpRes ML Effect
Now with your sequence ready, it's time to apply the image enhancer tool, in our case, BCC UpRes ML. To do this, open the "Effects" tab and use the search bar to find BCC UpRes.
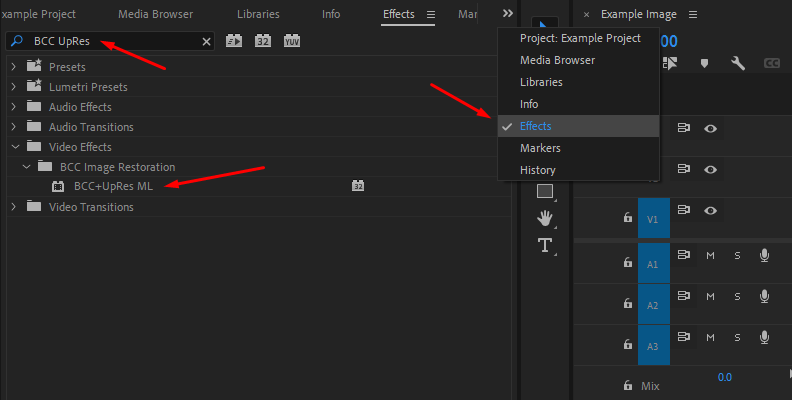
Once you locate the effect, drag and drop it over your image/video. UpRes ML can be used both as an AI video enhancer and an AI image enhancer.

-
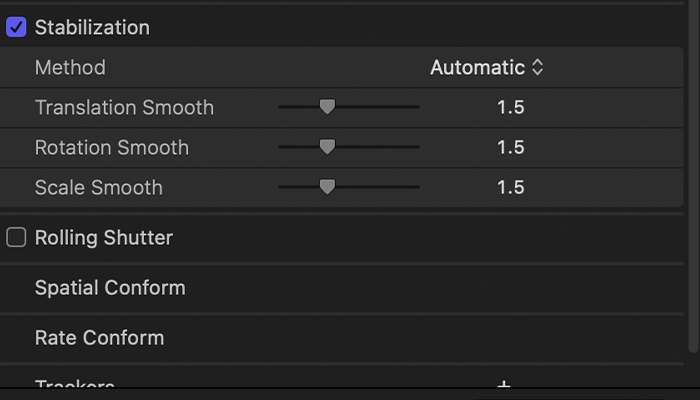
Step 5: The Effect Controls Panel
Once you apply the effect, it's time to access the Effect Controls panel. In other software, this section may be named differently, but in Premiere Pro, you can access it in the top-left corner of the screen.
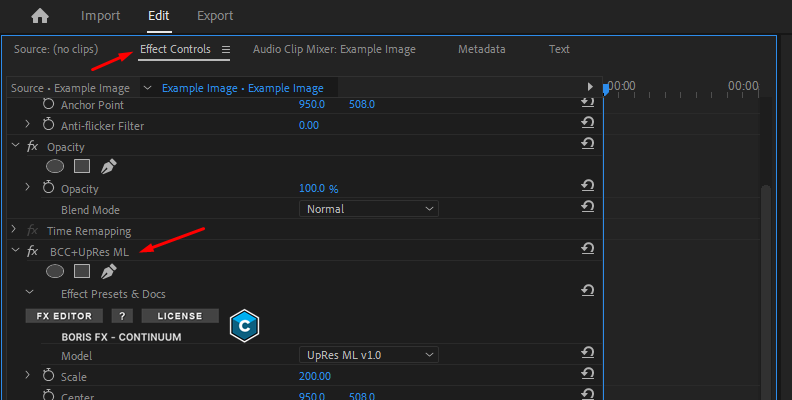
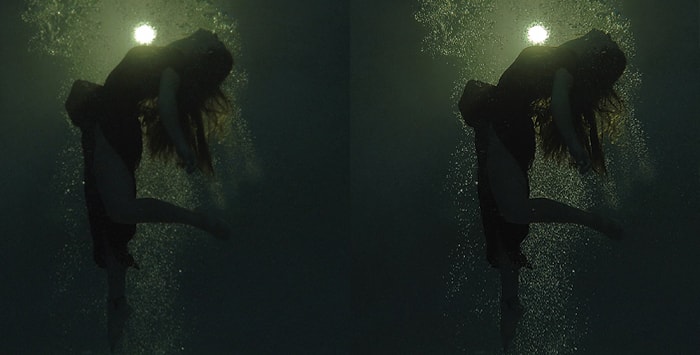
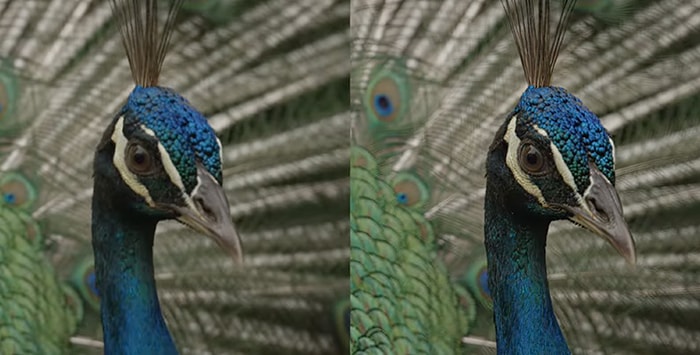
Here, you can scroll down and find all the settings for BCC+ UpRes ML. This is a machine-learning image upscaler (which is what the "ML" stands for) that will help you improve image quality through a simplistic, minimalist control panel, as shown in the image below.
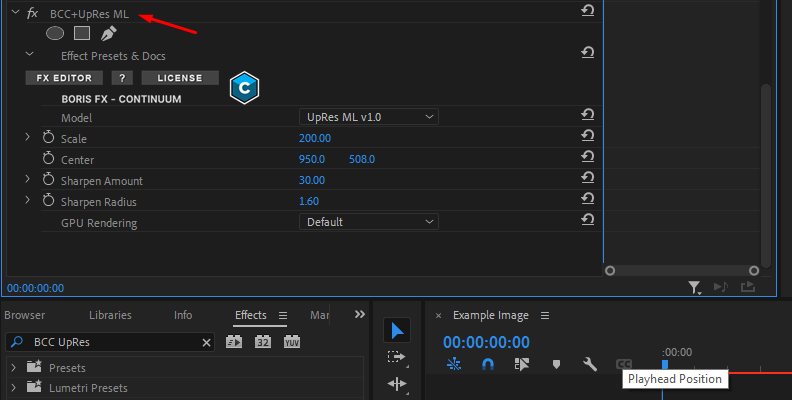
The "Scale" setting allows you to manually choose the scale, with the number 100 representing the original size of the image. You can read more about each individual parameter on the official BCC+ UpRes ML info webpage.
Try various combinations by adjusting settings within the Effect Controls panel and test the results.
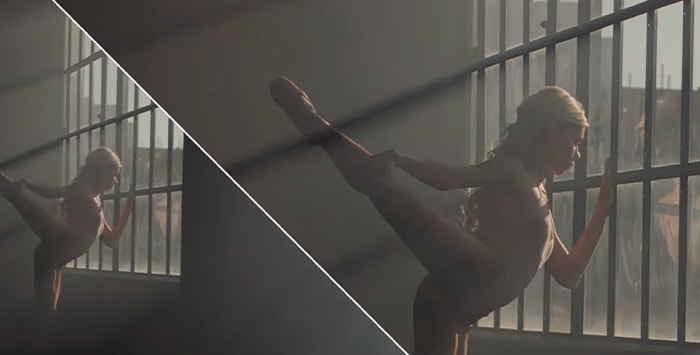
Once you like your upscale results, you can simply export the resized image that should now have a higher pixel count and is more suitable for your use case.
Pro Tips For Increasing Image Resolution

Enhancing image resolution requires a combination of software techniques and best practices. Here are some pro tips to achieve the best results:
- Start with the Highest-Quality Image Available
The higher the starting resolution, the better the results when upscaling. Always work with the best-quality original file. - Use AI-Based Software for the Best Results
AI-powered photo enhancer tools generally provide superior results compared to traditional resizing methods. They analyze the image and intelligently add missing details. - Avoid Excessive Upscaling
Increasing an image’s size beyond 2x or 4x more pixels may result in noticeable artifacts and reduced quality. Be realistic with your expectations. You cannot infinitely add pixels without losing quality in terms of authenticity and seeing some artificial changes. - Enhance After Resizing
Applying sharpening, noise reduction, and contrast adjustments after upscaling can help restore some of the lost details. - Use the Right File Format
Saving images in lossless formats such as PNG or TIFF for images or less compressed formats like ProRes or DNxHR for videos can help maintain quality, whereas JPEG or MP4 compression may introduce unwanted artifacts. - Apply Layered Editing Techniques
When using Photoshop work with layers to make non-destructive adjustments, allowing you to tweak details without affecting the original image. - Consider Recreating Simple Graphics
If the image or video features a simple logo or icon, it might be easier to recreate it in vector format rather than attempting to upscale a low-resolution version.
Final Words
That covers everything you need to know about increasing the resolution of an image or video successfully. Hopefully, this will help you with all your future tasks that need you to upscale, whether for print size, projectors, or anything else.
We wish you the best of luck, and thank you for reading!
FAQ
This section contains the most frequently asked questions and answers on the topic of increasing resolution of an image.
Will the quality of my footage drop after increasing resolution?
A: It really depends on how much you increase the resolution. If you go overboard with it, you may see some obvious artifacts that will reduce the authenticity of an image. The higher the "base" of pixels you start with, the better the results, meaning it's easier to turn a 2K image into 4K than a 480p video to 1080p. Also, it's not just about increasing the resolution. The details need to be added in a smart way, which is why AI image enhancer tools are superior.
How do I increase image resolution in Photoshop?
A: Open the image in Photoshop, go to Image > Image Size, and increase the resolution. Choose "Preserve Details 2.0" as the resampling method for the best results. After resizing, apply sharpening and noise reduction filters to enhance clarity and reduce artifacts.
How do I increase the resolution of an image on my Android phone?
A: To increase image resolution on Android, use apps like Remini,AI Image Enlarger,or Adobe Photoshop Express. These use AI to upscale images while preserving detail. Alternatively, try online tools like Let’s Enhance. Some gallery apps offer basic resizing, but AI-based tools give the best quality without pixelation.