


Particle Illusion is the effect you need to add quick and realistic particle effects for your motion graphics, titles, background, and more.
In this post, I’ll answer the most common questions about Particle Illusion and help you understand how to make the most of this powerful tool.
What is Particle Illusion?
Particle Illusion is a high-end 3D particle generator system that provides VFX artists, video editors, and motion graphic designers with the right tools to generate particles, offering professionally designed particle emitters.
It includes an extensive Emitter Library with over 2,500 drag-and-drop photorealistic effects to create explosions, fireworks, fire, smoke, dust, snow, rain, and other abstract elements to add to your titles, lower thirds, and motion backgrounds.
You can use the presets in Particle Illusion as they are, or you can dive into the controls view to tweak each parameter and create your unique custom animated particles to use in later projects.
Particle Illusion's 3D features were introduced in the 2021 version and include new 3D emitters, a Stage Camera View to see the particles in all 3D angles, and the possibility to toggle between 3D and 2D modes.
Particle Illusion exists in two versions: a paid plug-in for Adobe, Resolve, Avid, and other supported OFX hosts and as a free standalone application. The plug-in version can be purchased as part the Boris FX Continuum Suite. The free standalone version is available for download for non-commercial or personal use only with no trial mode, watermark, or time-limited features.
Where Can I Download Particle Illusion?
Particle Illusion is downloadable directly from our Hub Installer. Once you’ve installed and launched the application, you can get Particle Illusion or start a trial.
If you need help, check our Getting Started Training Series, where motion graphics experts John Dickinson and Ben Brownlee team up to guide you on your first steps and get familiar with Particle Illusion.
Particle Illusion Training: The Best Way to Start Learning Particle Illusion for Beginners
The Particle Illusion Getting Started training will upgrade your skill level from beginner to expert thanks to over 20 effective bite-sized tutorial videos that are easy to follow and understand. It will drive you through everything you need to know on your first steps with Particle Illusion.
The training is designed so advanced users can go back and select the topic they want to review, and once you complete the Getting Started Training, you can find more Particle Illusion tutorials in our video library.
Steps and Workflow of Particle Illusion
Step 1: Run Particle Illusion
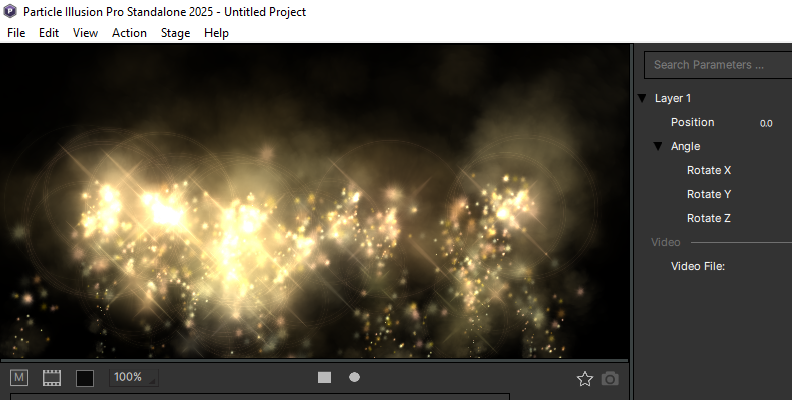
Run the standalone version of Particle Illusion.
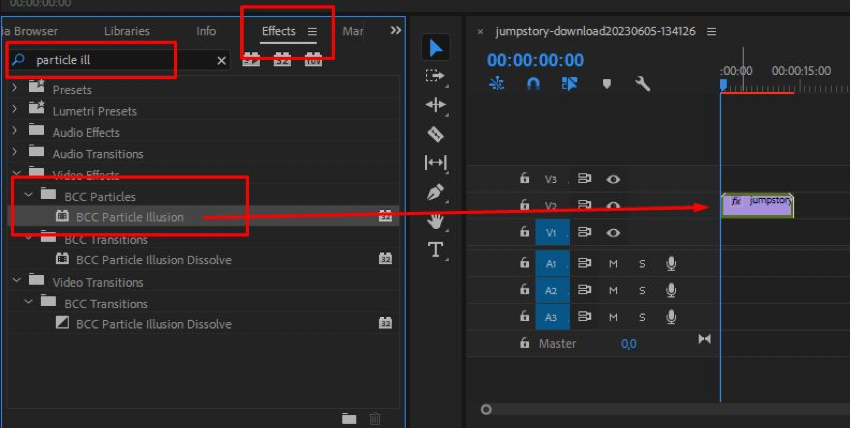
If you're using the plug-in version, search for the plug-in and drag it to your clip.
Step 2: Set Up Your Project Settings
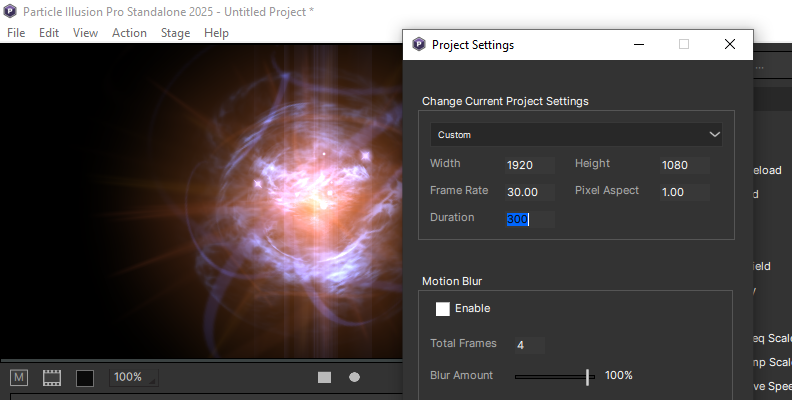
If you're using the plug-in version, your project settings will depend on your video clip. But if you are working with the standalone application, you can customize your stage size, frame rate, and pixel aspect and enable motion blur.
Go to View > Project Settings. Particle Illusion offers presets you can use, but if you require unique settings, you can specify them in this window. Click Apply to set the new settings.
Step 3: Start With a Preset
On the top left of the screen, you have the Emitter Preview where you can see how the particles will look.
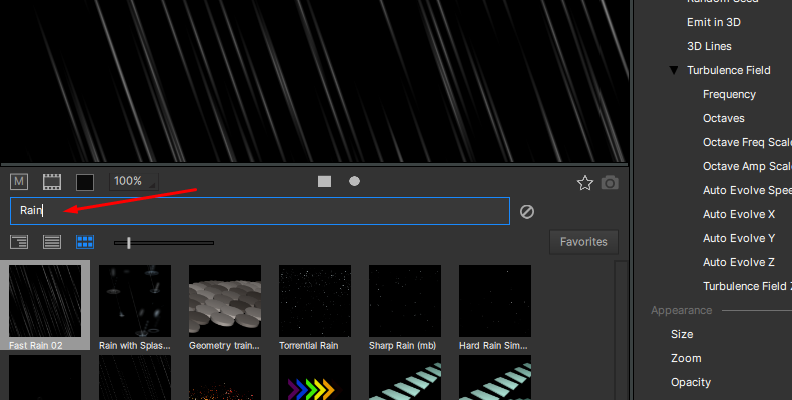
On the bottom left is the Emitter Library Browser. This is where you want to start when you want to create particles.
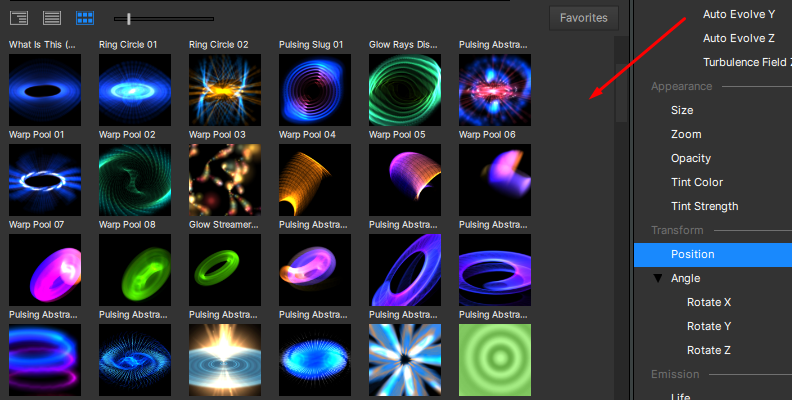
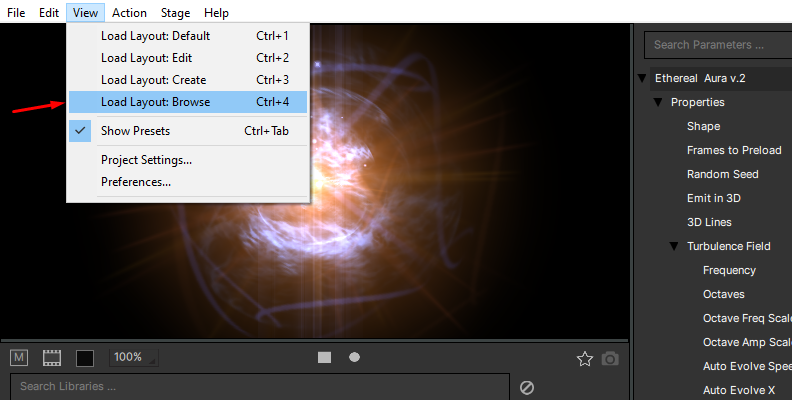
Changing the Browse layout gives you a better view of all the presets. Go to the View and select "Load Layout: Browse."
Particle Illusion allows you to search by the name of the emitter, folder names, and tags. You can enable these options on View > Preferences. Check your preferred options under the Emitter Search Option.
Use the search box to type in your idea. For example, if you want to create rain, type in "rain." Particle Illusion will show you all the presets with the word rain in the emitter name, folder name, or tags. Click on each preset to preview it.
You can interact with the Emitter Preview by clicking and dragging the cursor to see how the particles would behave.
Save presets as favorites by selecting them and clicking the star below the preview window. This allows you to find presets faster. Next time, click the Favorites button to display only the presets marked as favorites.
Step 4: Add Emitters
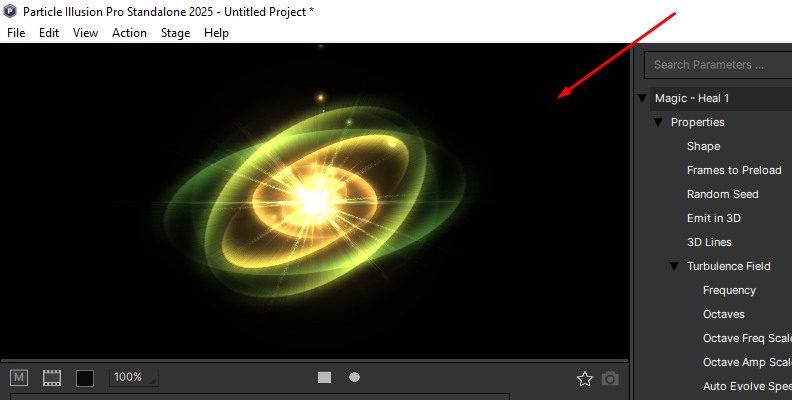
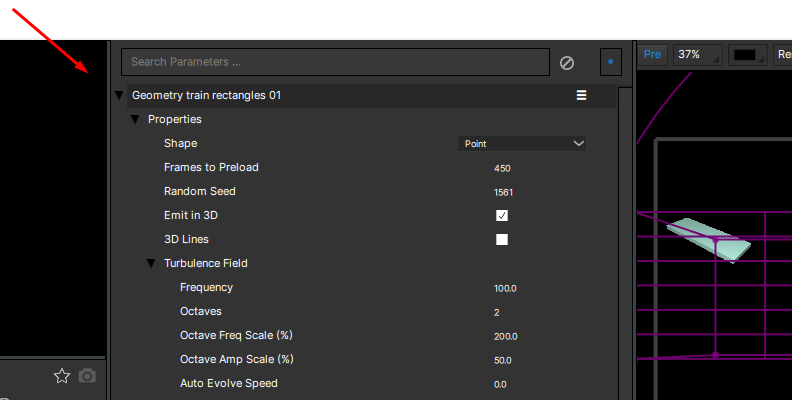
Double-click to add the emitter to the Stage when you find the emitter you like. You'll know you have applied it correctly if you see the parameters displayed in the Control's View in the center.
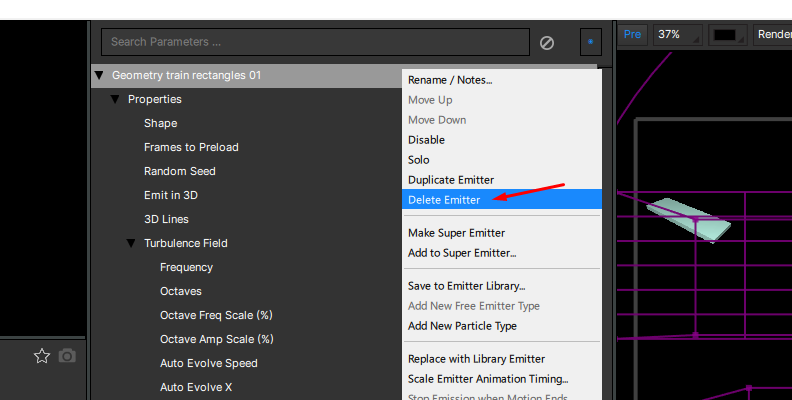
If you need to remove the emitter to add a different one, you can do it from the Controls View. Click on the hamburger icon and select Delete Emitter.
Step 5 Edit Emitter
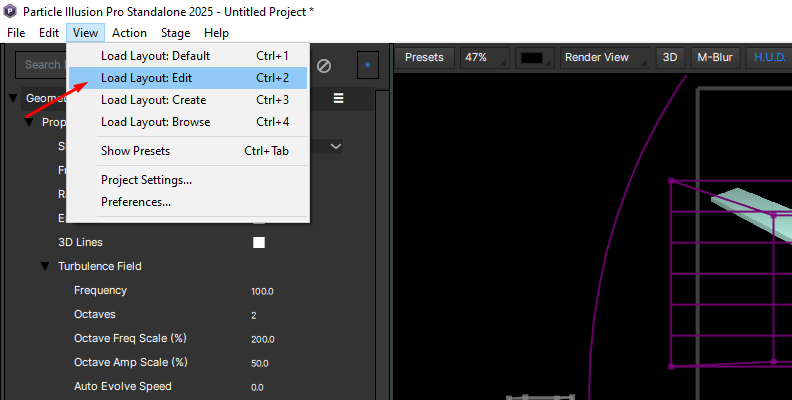
You can switch to the Edit layout in View > Load Layout: Edit to have more room to navigate around the Control, Node, Graph, and Stage views.
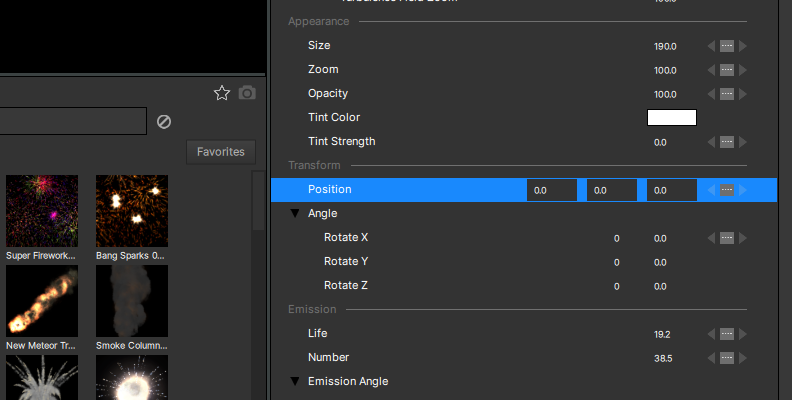
On the Control's View, you'll find the parameters for each emitter. You can edit how the particles are created and behave, animate them, change shape, size, velocity, color tint, number of particles, and many more options.
Step 6: Render and Export
When you finish editing the particles, click the Render button on the right end of the timeline. It will bring up the Render and Export Settings window.
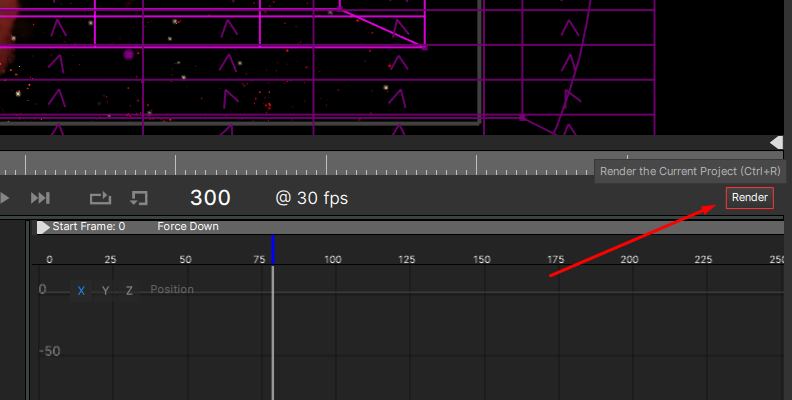
Choose the location to save your rendered file, code, render type, resolution, etc., and click Start Render.
You don't need to render if you're working on the plug-in version: all you have to do is click “Apply” to return to your editing program.
How to Animate Particles in Particle Illusion
Here are the general steps to animate particles in Particle Illusion.
Step 1: Select a preset from the Emitter Library Browser and move to the Edit layout for a better view (you can work from the default layout, too, if it feels right for you.)
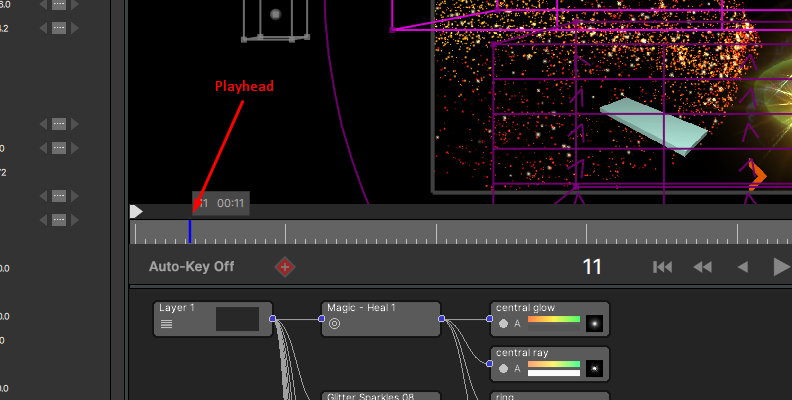
Step 2: Place the playhead at the beginning of the timeline or where you want the animation to start.
Step 3: Click the Auto-Key On and adjust the position, size, and all the parameters you want to achieve the desired type of animation.
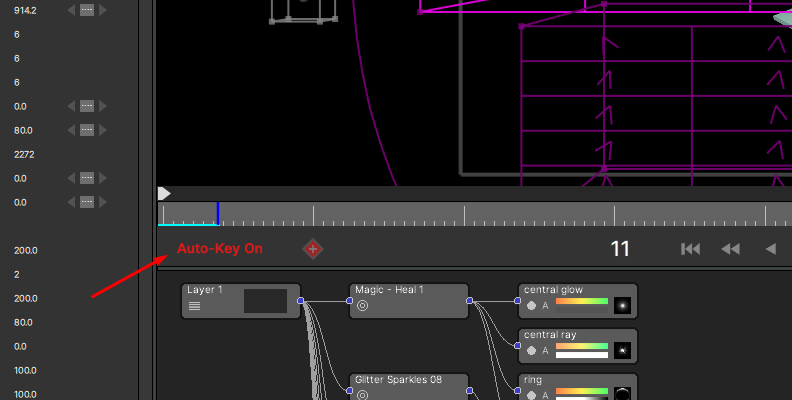
If you only wish for the spark particle to move up and down, then toggle Auto-Key on and move the emitter to the starting position. Play or move a few frames forward and move the emitter following the movement you want to obtain. Continue moving forward frame by frame and changing the position of the emitter. You can later move each keyframe in the timeline to adjust the timestamps.
Everything you change in the parameters when Auto-Key is on will be keyframed automatically. So click Auto-Key off when you don’t want to animate any changes.
Step 4: Render the animated particle to import it to your composite software.
Tips and Tricks in Particle Illusion
Tip #1: Master the Interface
Familiarizing yourself with the interface will help you follow the Getting Started Training and other video tutorials.
Tip #2: Use Different Views
You'll get used to working on each layout view as you work with Particle Illusion. You can't reorganize these layouts to customize your workspace for now, but you can alternate between the preset configurations.
Tip #3: Use the Tag Search
Presets are the starting point for every particle effect, and having the Tag Search enabled will make things even easier.
Tip #4: Create Custom Presets
You can save your personalized presets as custom emitters by clicking the hamburger icon and choosing "Save to Emitter Library."
Tip #5: Duplicating Particles
You can duplicate particles to create more dynamic effects on your particles. Select the particle node to edit a particle. When you're done, right-click the node and choose "Duplicate Particle Type."
Tip #6: Visit the Forums
Visit the Particle Illusion forums occasionally to find more tips and tricks from more experienced users, ask questions, and discuss Particle Illusion with other users.
Where to Find Presets for Particle Illusion
All the 2500+ emitters featured in Particle Illusion are free, but you need to download and install them separately from the main installer.
To download, follow these steps.
Step 1: Download and install Particle Illusion and run the application.
Step 2:Now, if you see a pop-up window the first time you run it, it will show you the free emitters available and provide you with a direct link to the download page. Just click the Download button to be redirected to our website. If you don’t see the welcome pop-up window, go to the menu bar Help > Download Emitters.
Step 3: Run the emitter libraries installer and wait for the installation process to end.
Step 4: Run Particle Illusion. You should see all the presets available in the Emitter Library Browser.
Your new presets will be available for the standalone and plug-in versions to generate perfect sparkles, dust, bubbles, fireworks, and more.
System Requirements for Particle Illusion
The minimum requirements are:
- A computer running OSX 10.15 or Windows 10
- 64-bit Intel or AMD CPU
- 8 GB RAM
- SSD storage
- ATI, Nvidia, or Intel graphic card. (Learn more about the supported graphic cards here.)
To ensure that your system can bear the heavy processing, consider the following when you feel your computer is having trouble working around Particle Illusion:
- Keep your graphics card drivers updated.
- Upgrade your graphics card and CPU.
- You can also adjust your particles in the project settings and emitter controls to fit your specs. You will find this in our training series.
Particle Illusion vs. Trapcode Particular: Which is Should I Use?
To compare Trapcode Particular with our Particle Illusion’s 3D particle generator, I made the comparison list below to help you identify which program is the best one for your needs.
Comparison Table
| Particle Generator | Main Features | Pros | Cons |
| Trapcode Particular | 3D Particles, 3D Objects, Physics and fluids simulation, flocking/swarming and predator/prey behaviors, parent/child particle systems, After Effects integration, Particular Designer, 355 Trapcode Particular presets. | Works with After Effects and other hosts. Use 3D models as emitters. | Not available on its own, only on bundle plans and perpetual licenses. Trapcode Particular perpetual license is $999. Slight learning curve. |
| Particle Illusion | 3D Particles, Integrated 3D Render Camera, Unlimited Hardware-accelerated particles, Unlimited Emitters, 2500+ Presets, Supports up to 8K, Standalone and plug-in versions. | Includes 2500+ presets. After Effects Integration. Integration with other Boris FX products like Mocha.3D model and 3D widget support. Easy Preset-Driven Workflow. Node-based Navigation. Free personal use standalone version. | The standalone version does not support composition over source video. |
Particle Illusion: Free Version vs Plug-in Version
The main difference between the free and plug-in versions is that the Particle Illusion standalone application is free. The plug-in version can be purchased with the Continuum Suite. Note: the free version is only for non-commercial or personal use.
You can purchase Particle Illusion with a monthly subscription for $25, or get the better deal with the annual subscription of $16.25 monthly (billed $195 annually).
Main Differences:
- Upgrades: the plug-in includes all future upgrades with your subscription and 12 months of free upgrades for the perpetual license.
- Composite over the source video: the plug-in version allows you to composite directly into the source video from your host. Also, you can adjust the particle settings from your compositing software.
- Integrated Compositing Tools: you can access tools such as Color Correction, Glow, and Blending Modes to integrate your particles better.
- Render Times: with the plug-in version, you don't need to render your particles to apply them to your host. Click Apply in the Particle Illusion interface, and then continue editing the parameters inside After Effects, Resolve, or any supported host.
- Motion Tracking and Masking: track and mask your particles more accurately using the award-winning technology of Mocha Pro, and forget about keyframing within Particle Illusion.
- After Effects Integration: the plug-in allows you to use After Effects paths and text as animation paths for emitters or emission sources. Plus, it allows you to add particles to your text on After Effects seamlessly.
- FX Browser: search the plug-in Particle Illusion, add it to your clip or still image like a regular effect, and see what it looks like in real time.
- Beat Reactor: the Beat Reactor integration links a music source to your particles' parameters.
- Support: the plug-in version offers premium support via email and phone.
How to Add Particles to Text in Particle Illusion
Here’s the basic workflow to add particles to your texts with Particle Illusion in After Effects.
Step 1: Create your text layer in After Effects and add another layer to apply Particle Illusion.
Step 2: Go to your Effects Control Panel and Launch Particle Illusion.
Step 3: Select “Composite Over Source Video” from the Preview background to see the text.
Step 4: Browse your favorite preset and start animating. Use Deflectors, Forces, and Turbulence to add a nice effect to your particles.
Step 5: Press Apply when you're done. Remember, you can still adjust your parameters from After Effects.
To do this in the standalone version, you must first type your text on Photoshop or other image editing software and save it as a PNG with a transparent background. Then, follow the next steps to use a custom particle shape.
Step 1: Choose a basic emitter from the presets. Select the Particle node from the Node View to view its parameters in the Controls View.
Step 2: Click on Shape Image and then Import Shape. Browse for your PNG image and open it.
Step 3: Select your import settings and click Apply.
Step 4: Now, back in your Controls View, select Single Particle. Scale your particle to match the text size on your video editing software. As a pro tip, scale it bigger to scale it down when you import it into your host.
Step 5: Add particles around the image, and use force and deflector to create motion.
Step 6: Render and import to your host. Add the clip as a top layer and adjust the video so the particles match the Text layer.
Advanced Techniques in Particle Illusion
Particle Illusion is a user-friendly application, but you can also create intricate particles by adjusting its settings.
Super Emitters
Super Emitters are exceptional types of emitters in Particle Illusion. It does not work as a regular emitter creating particles but instead creates more emitters, which make the particles. Think of it as a container of emitters as they are generating particles.
Forces and Deflectors
Forces and deflectors will help you create motion for your particles. Forces push the particles in specific directions while Deflectors redirect particles without punching them back. Using them creatively can help you create engaging effects for your compositions.
3D Models
The 3D Model Emission feature was included in Particle Illusion 2022.5. With this new feature, you can import OBJ and Cinema 4D format to shape your particles creatively.
To dive deeper into the advanced techniques, check our video tutorials once you feel ready to take the following steps.
Final Thoughts
Download Particle Illusion now and start creating impressive particles for your videos! You can try it for free, and whenever you're ready, upgrade to the plug-in and select the best plan for you, or buy a perpetual license of the Continuum Suite. Upgrading to the plug-in version of Particle Illusion will provide you with the perfect tools to blend, color, and level up your compositions for your future projects.


