


< Previous | Contents | Manuals Home | Boris FX | Next >
Rotoscope Control Panel
The roto panel controls the assignment of a shot’s blips to cameras or objects. The roto mask can also be written as an alpha channel or RGB image using the image preprocessor. See also Roto-Panel Spline Operations in the Camera View.
Note: the roto-spline system is intended for determining how to assign new blips and thus produces binary yes or no output (ternary or higher if moving objects are being 3-D tracked); it does not produce gray-scale data with smooth edges for compositing. The truly determined might write masks at 4x resolution then filter down in an external app (or even SynthEyes).
Each entry in the central Roto layer list can be a spline or a stored alpha layer, which is often the output of the Mask ML process. The term layer is used to refer to either a spline or an alpha layer.
Magic Wand. Lets you click out an arbitrarily-shaped spline with many control points. Double-click the most recent vertex while creating, to toggle between corner and smooth vertices. Right-click or hit the ESCape key to stop adding points. One press lets you create one spline. Hold shift when clicking to lock it on to create multiple splines. Turn off the “One spline at a time” preference to always create multiple splines.
Create Circle. Lets you drag out a circular spline. One press lets you create one spline. Hold shift when clicking to lock it on to create multiple splines. Turn off the “One spline at a time” preference to always create multiple splines.
Create Box. Lets you drag out a rectangular spline. One press lets you create one spline. Hold shift when clicking to lock it on to create multiple splines. Turn off the “One spline at a time” preference to always create multiple splines.
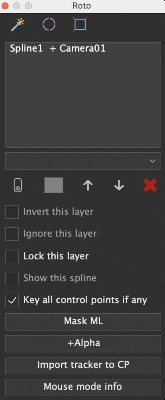
Roto Layer List. An ordered list of splines and alpha layers, each indicating the camera or object they are assigned to. The default Spline1 is a rectangle containing the entire image. A blip (feature) is automatically assigned to the camera/object/garbage of the first aka top spline in the list that contains the feature: layers at the top of the list are on top in the image. Any blip that doesn’t fall in any spline is garbage, unless an alpha channel is present in the shot itself (from the Shot Settings panel), which will be examined to determine the blip’s assignment. Double-click a layer in this list to rename it as desired. This list shows the layer name and object assignment; between the two is an indicator: “+” for a normal layer, “-“ for an inverted layer, or “o” for an ignored layer (roughly, a small zero). If the layer is hidden, its entry will be in parentheses, ie “(Spline02
+ Garbage)”.
Camera/Object Selector. Drop-down list. Use to set the camera or object of the layer selected in the Roto Layer List. You can also select Garbage to set the layer as a garbage matte.
Enable. Button. Animatable layer enable. Right-click, shift-right, and control-right delete a key, truncate, or delete all keys, respectively.
Color. Swatch. Show and set the color of the spline. (Also present in the Hierarchy View.)
Move Up. Push button. Moves the selected layer up in the Roto Layer List, making it lower priority. Note that you can also drag layers to change their ordering in the Hierarchy View.
Move Down. Push button. Moves the selected layer down in the Roto Layer List, making it higher priority. Note that you can also drag layers to change their ordering in the Hierarchy View.
Delete. ****Deletes the currently-selected layer. You can also use the Delete key in the Roto Layer List.
Invert this layer. Checkbox. Inverts it, ie everything outside is considered to be inside, and everything inside is considered to be outside. In all known cases, this option is unnecessary: there will be a simpler and more self-explanatory stack with no inversions!
Ignore this layer. Checkbox. When checked, the spline will be shown, but won’t affect
the blip assignments or any mask generation.
Lock this layer. Checkbox. Turn on to lock this layer in the camera view, even when the roto panel is open, so that you don't inadvertently change one layer while working on another.
Show this spline. Checkbox. Turn on and off to show or hide the selected spline. Also see the View/Only Selected Splines menu item.
Key all control points if any. Checkbox. When on, moving any control point will place a key on all control points for that frame. This can help make keyframing more predictable for some splines.
Mask ML. Open the Mask ML control panel for AI-based matting, or close it if it is already open.
+Alpha. Create a new alpha-channel layer in the Roto Layer List; you’ll be asked to select the first frame of the shot *(independent of the shot’s start/end frame settings!) *****Shift-click the button to open the file-picker back up to see and change the current location.
Import Tracker to CP. Button. When activated, select a tracker then click on a spline control point. You'll be asked whether you want to import the tracker's relative motion (the CP won't change on the current frame), or the tracker's actual position (the CP will leap to the tracker's position). The control point will be keyed on each frame where the tracker is valid. One press lets you import once. Hold shift when clicking to lock it on to import to multiple control points. Turning off the “One spline at a time” preference will always set up to import multiple points.
Mouse mode info. Brings up a dialog with a condensed reference to what you can do to splines with the mouse in the camera view. You can lasso or select then move multiple control points, rotate or scale the spline, etc.
©2026 Boris FX, Inc. — UNOFFICIAL — Converted from original PDF.