Tracker
Tracking is a technique that involves analyzing the motion of an image over time. Silhouette provides multiple options for tracking: Point, Planar, Mocha, Flow and Object.
• Point: Track one, two or four track points.
• Planar: Tracks several points (corners, edges and ridges) to define a plane.
• Mocha: Provides 2D transformation data by tracking planes rather than points.
• Object: Detects and tracks human bodies, faces or license plates.
• Roto ML: Automatically rotoscopes shapes by fitting them to an ML-generated matte.
Planar Trackers
Two planar trackers are provided: Mocha and Planar. Regardless of which one you use, the workflow is the same.
The key to getting the most out of the Mocha and Planar trackers is to find planes of movement in your shot which coincide with the object that you want to track. Sometimes it will be obvious--other times you may have to break your object into different planes of movement. For instance, if you were tracking a tabletop, you would want to draw a spline to avoid a flower arrangement in the center of the table, since it is not on the same plane and will make your track less accurate.
1 In the standalone, load some source footage and create a session using the Roto template.
or
2 In the plug-in, select Type > Roto when creating the project.
3 Make sure you are viewing and editing the Roto node by single-clicking on it in the Trees window or selecting it in the Node Selector at the top left of the Viewer.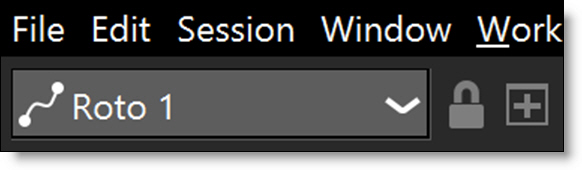
Note: The Tracker is available as a separate node, but is also built into the Depth, Morph, Power Matte, Roto and Roto Blend nodes. This tutorial demonstrates the use of the Tracker from within the Roto node.
4 Go to the frame where you want to start tracking.
5 Set the View to Foreground for the fastest speed when tracking. In the Foreground view, no processing occurs and therefore it is faster than View > Output.
6 Create a shape around the object that you would like to track and make sure that there is some detail inside of the shape. It does not have to be exact and it is best to leave a little extra room around the object. In addition, you can use more than one shape as long as they are on the same geometric plane.
7 Choose the Tracker (Shift-T) in the Toolbar.
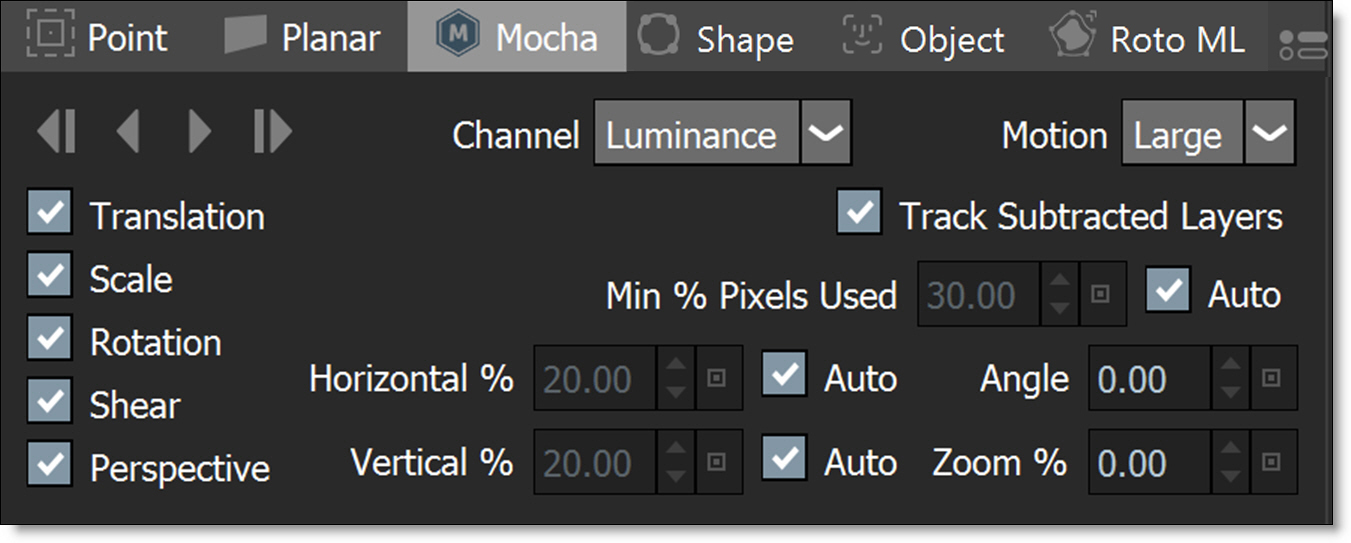
8 In the Tracker tab located at the bottom of the screen, select either the Mocha or Planar tab.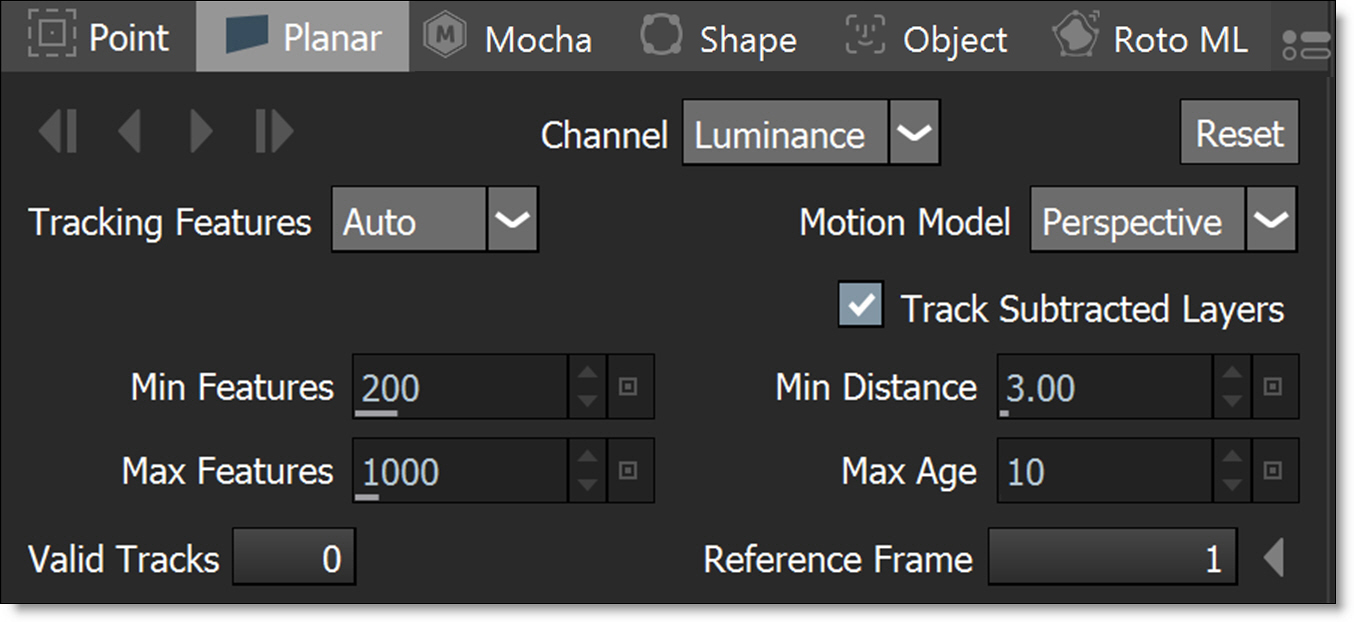
9 Enable Preview in Pre-Processing.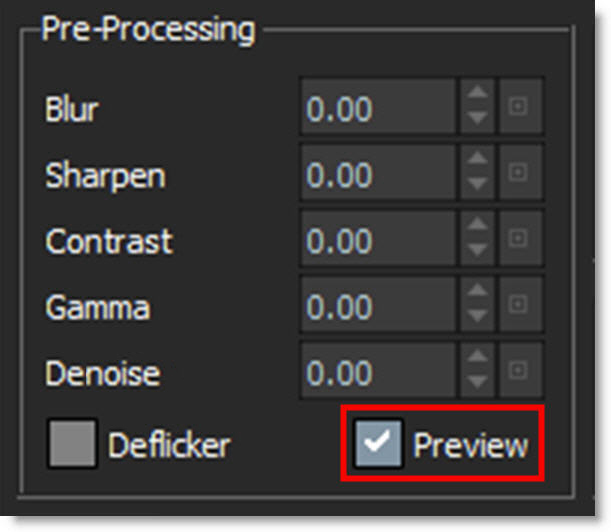
The image in the Viewer becomes black and white and displays the color space that you will track in.
10 Select the color space to track with in the Channel pop-up menu.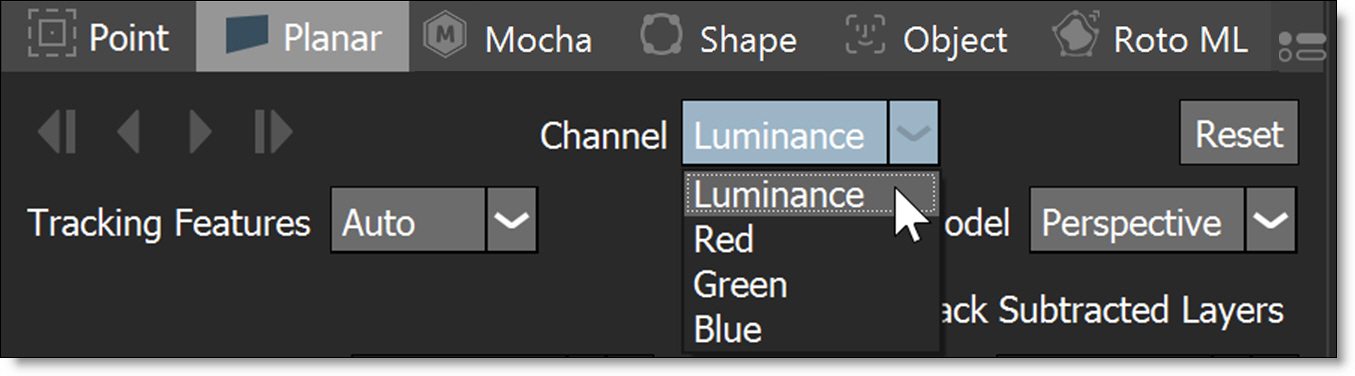
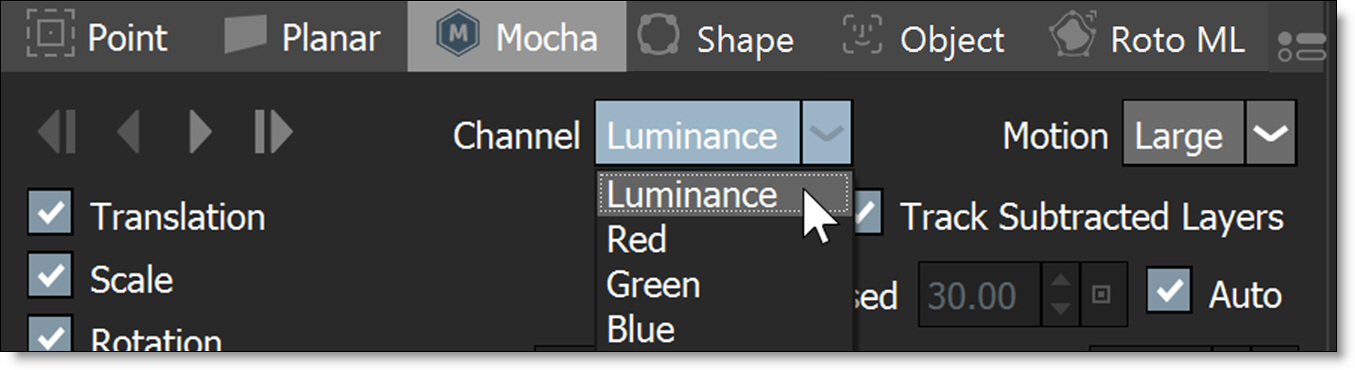
Pick the color space that displays the best contrast in the object you are tracking.
11 Disable Preview in Pre-Processing.
12 Select the tracking shape you created in the Object List.
13 Hit either the forward or backward track button depending on which direction you are tracking.
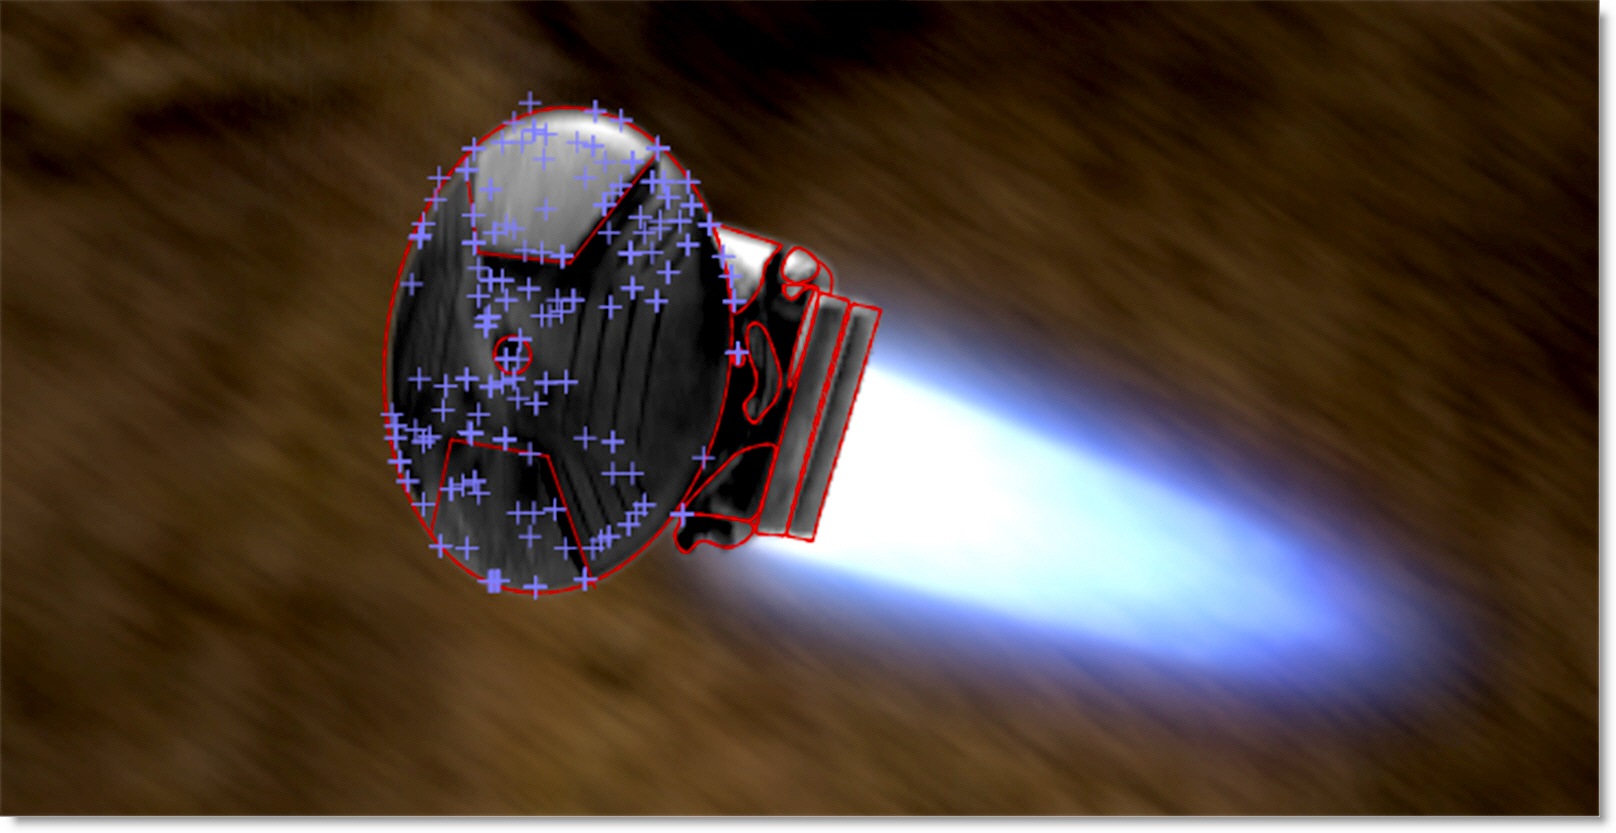
Both the Mocha and Planar trackers use layers to store the tracking data.
• If shapes are selected and not in a layer, clicking the Track Forward/Backward buttons will create a new layer, make it active and begin tracking.
• If shapes are selected in an unselected layer, clicking the Track Forward/Backward buttons will make the layer active and begin tracking.
14 When the tracking is done, that’s it, you're done.
The tracking data is automatically applied to the selected layer.
15 After tracking, if you are not happy with the results, try the different techniques listed in Planar Tracking Tips and Tricks and Mocha Tracker Tips and Tricks.
16 If you want to use Stabilization, click the Stabilize icon above the Viewer and the Stabilize toolbar appears.
17 Choose either the Active Layer or a layer from the list and select Enable. Available layers are organized by node.
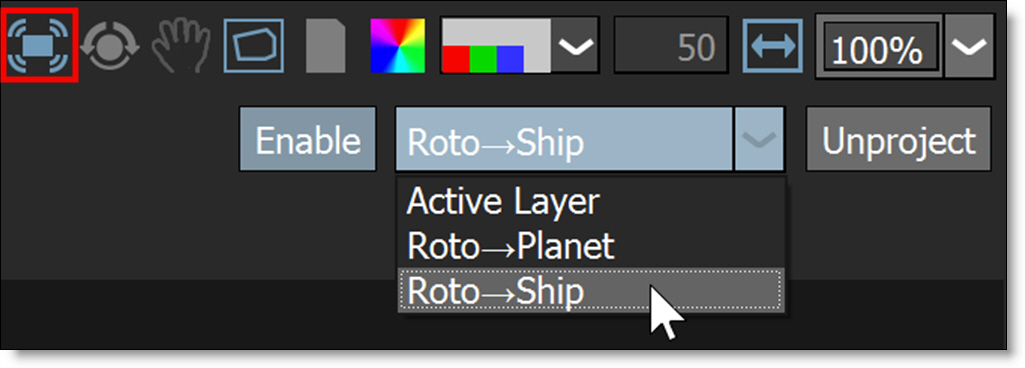
The Viewer is now stabilized based on the selected layer’s tracking data. Clicking the Stabilize icon again hides the Stabilize toolbar, but stabilization remains active until disabled.
18 Make shape adjustments and keyframe the shape as necessary using the Reshape and Transform tools.
19 When shape editing is complete, click on the Stabilize icon if it is not highlighted and deselect Enable.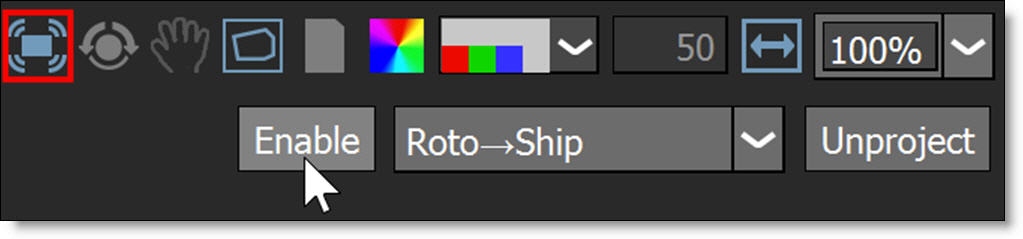
The Viewer is returned to its normal state.
20 Click the Stabilize icon again to close its toolbar.
Handling Occlusions While Mocha or Planar Tracking
In some cases, there are parts of an image that can interfere with the effectiveness of the Mocha or Planar trackers. To handle this, you can use exclusion areas while tracking.
Exclusion Area - Using the Occlusion Matte Input
1 Create an occlusion matte with the Mask ML and Matte Assist ML nodes.
Note: Any node that has or creates a matte can be used as the occlusion matte.
2 Connect the output of the Matte Assist ML node into the Occlusion Matte input (left edge) of the Roto node.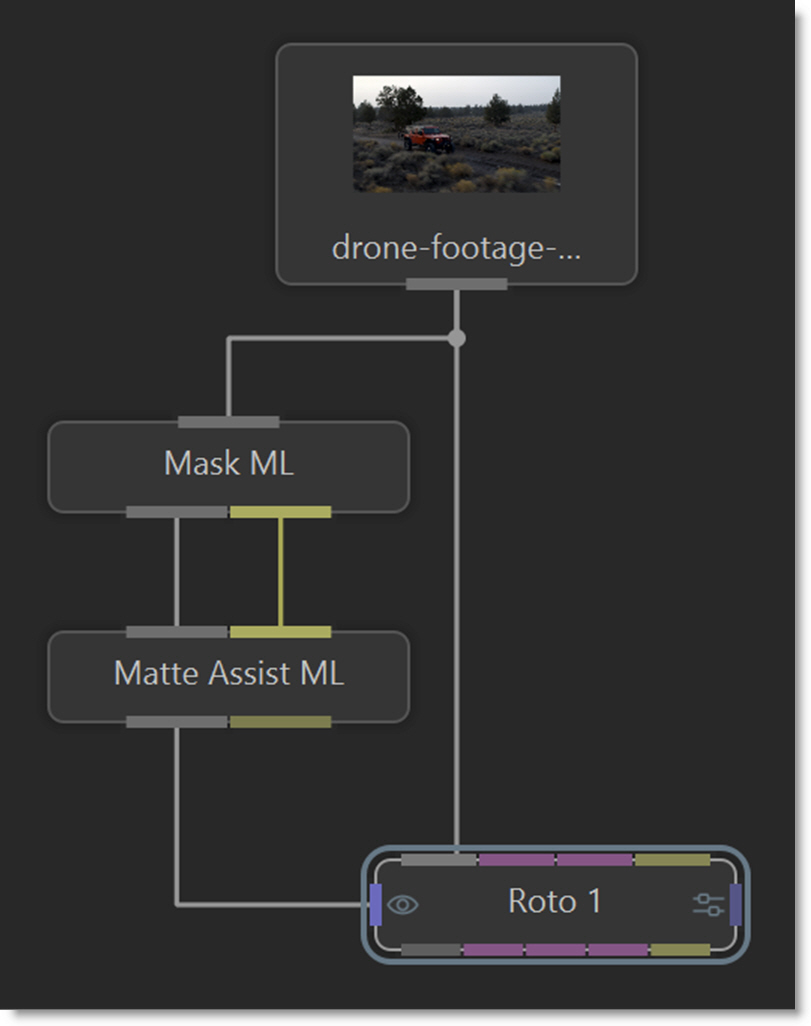
Now, the area within the occlusion matte will be excluded when tracking with the Mocha or Planar trackers.
Exclusion Area - To Be Tracked
An area of exclusion can be tracked simultaneously with the primary tracking area.
1 Create a shape around the object that you would like to track and place it in a layer. This will be referred to as the primary layer.
2 Create a shape around the area that you would like to exclude from the tracking process, place it in a layer and set the layer’s Blend mode to Subtract.
3 Place the subtractive layer above the primary layer.
4 Select both layers.
5 Make sure that Track Subtracted Layers is enabled.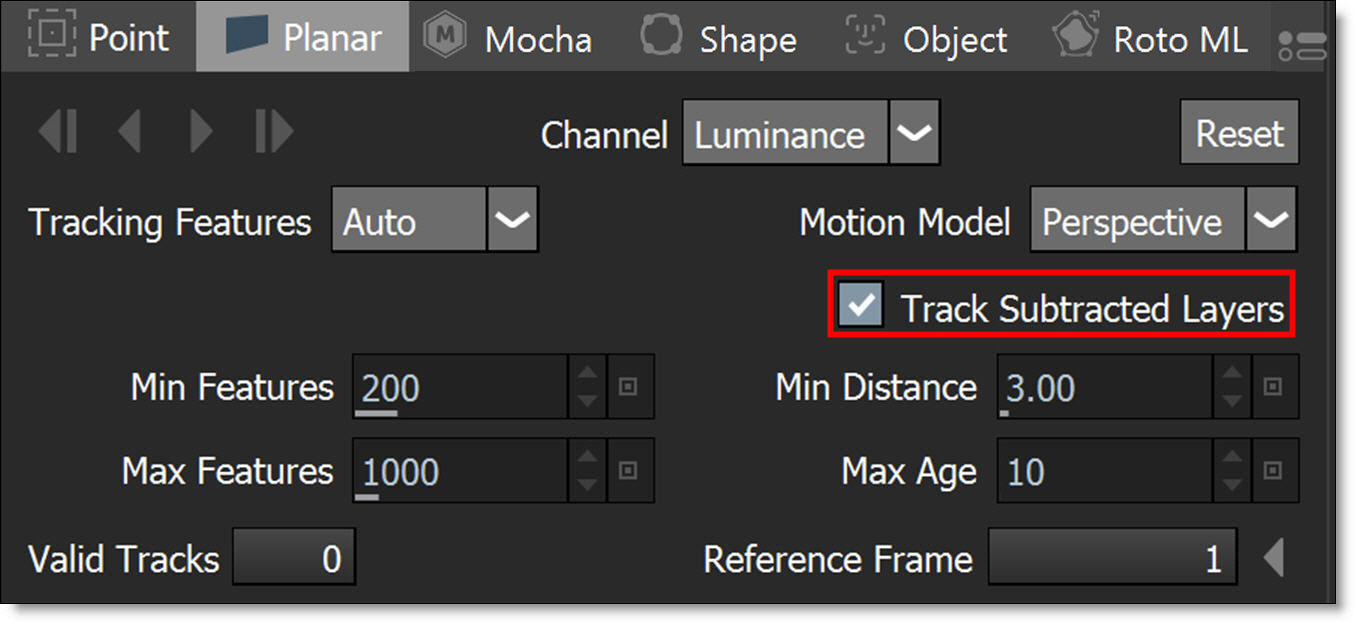
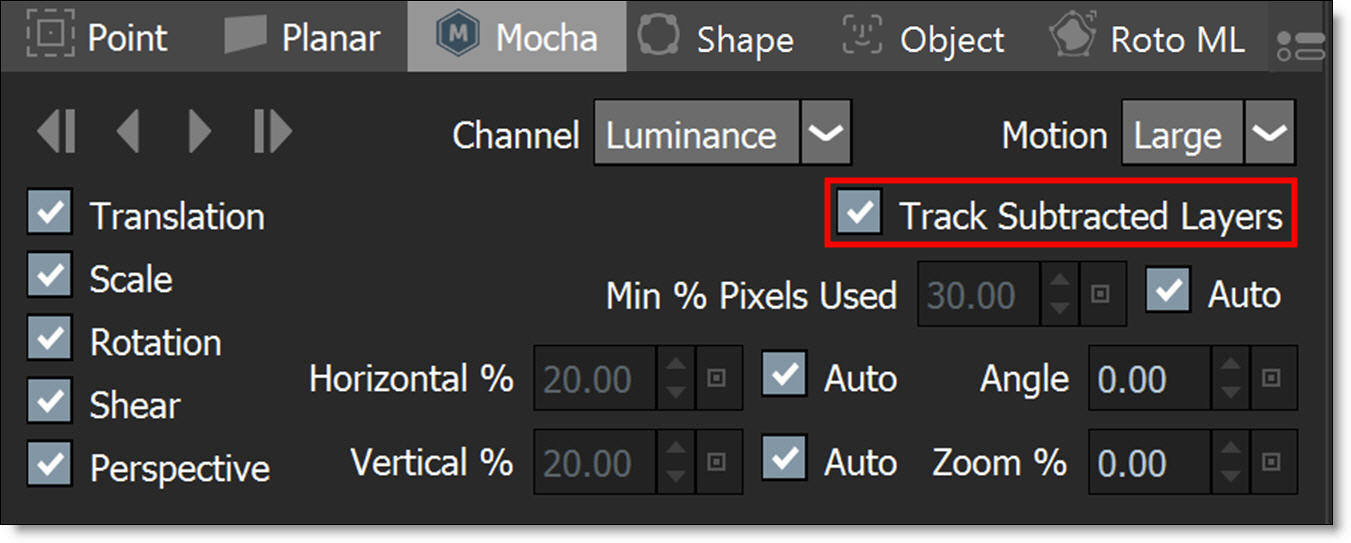
Note: If you don’t want to track the subtractive layer because 1) it was already tracked or 2) the shape was manually keyframed, disable Track Subtracted Layers.
6 Hit either the Track Forward or Backward button depending on which direction you are tracking.
Now the area within the subtract layer is not analyzed by the Mocha or Planar trackers when tracking the primary layer.
Exclusion Area - No Tracking
When an exclude shape should not be tracked by the Mocha or Planar trackers, create a subtractive shape above the primary tracking layer.
1 Create a shape around the object that you would like to track and place it in a layer. This will be referred to as the primary layer.
2 Create a shape around the area that you would like to exclude from the tracking process and keyframe it throughout the sequence. Set the shape’s Blend mode to Subtract.
3 Place the subtractive shape above the primary layer.
4 Select both the primary layer and the subtract shape.
5 Make sure that Track Subtracted Layers is disabled.
6 Hit either the Track Forward or Backward button depending on which direction you are tracking.
Now the area within the subtract shape is not analyzed by the Mocha or Planar trackers.
Offset Planar Tracking Using Layers
There are times when the object you are planar tracking becomes obscured, and in these instances, you can use a layer to compensate for the obscured object.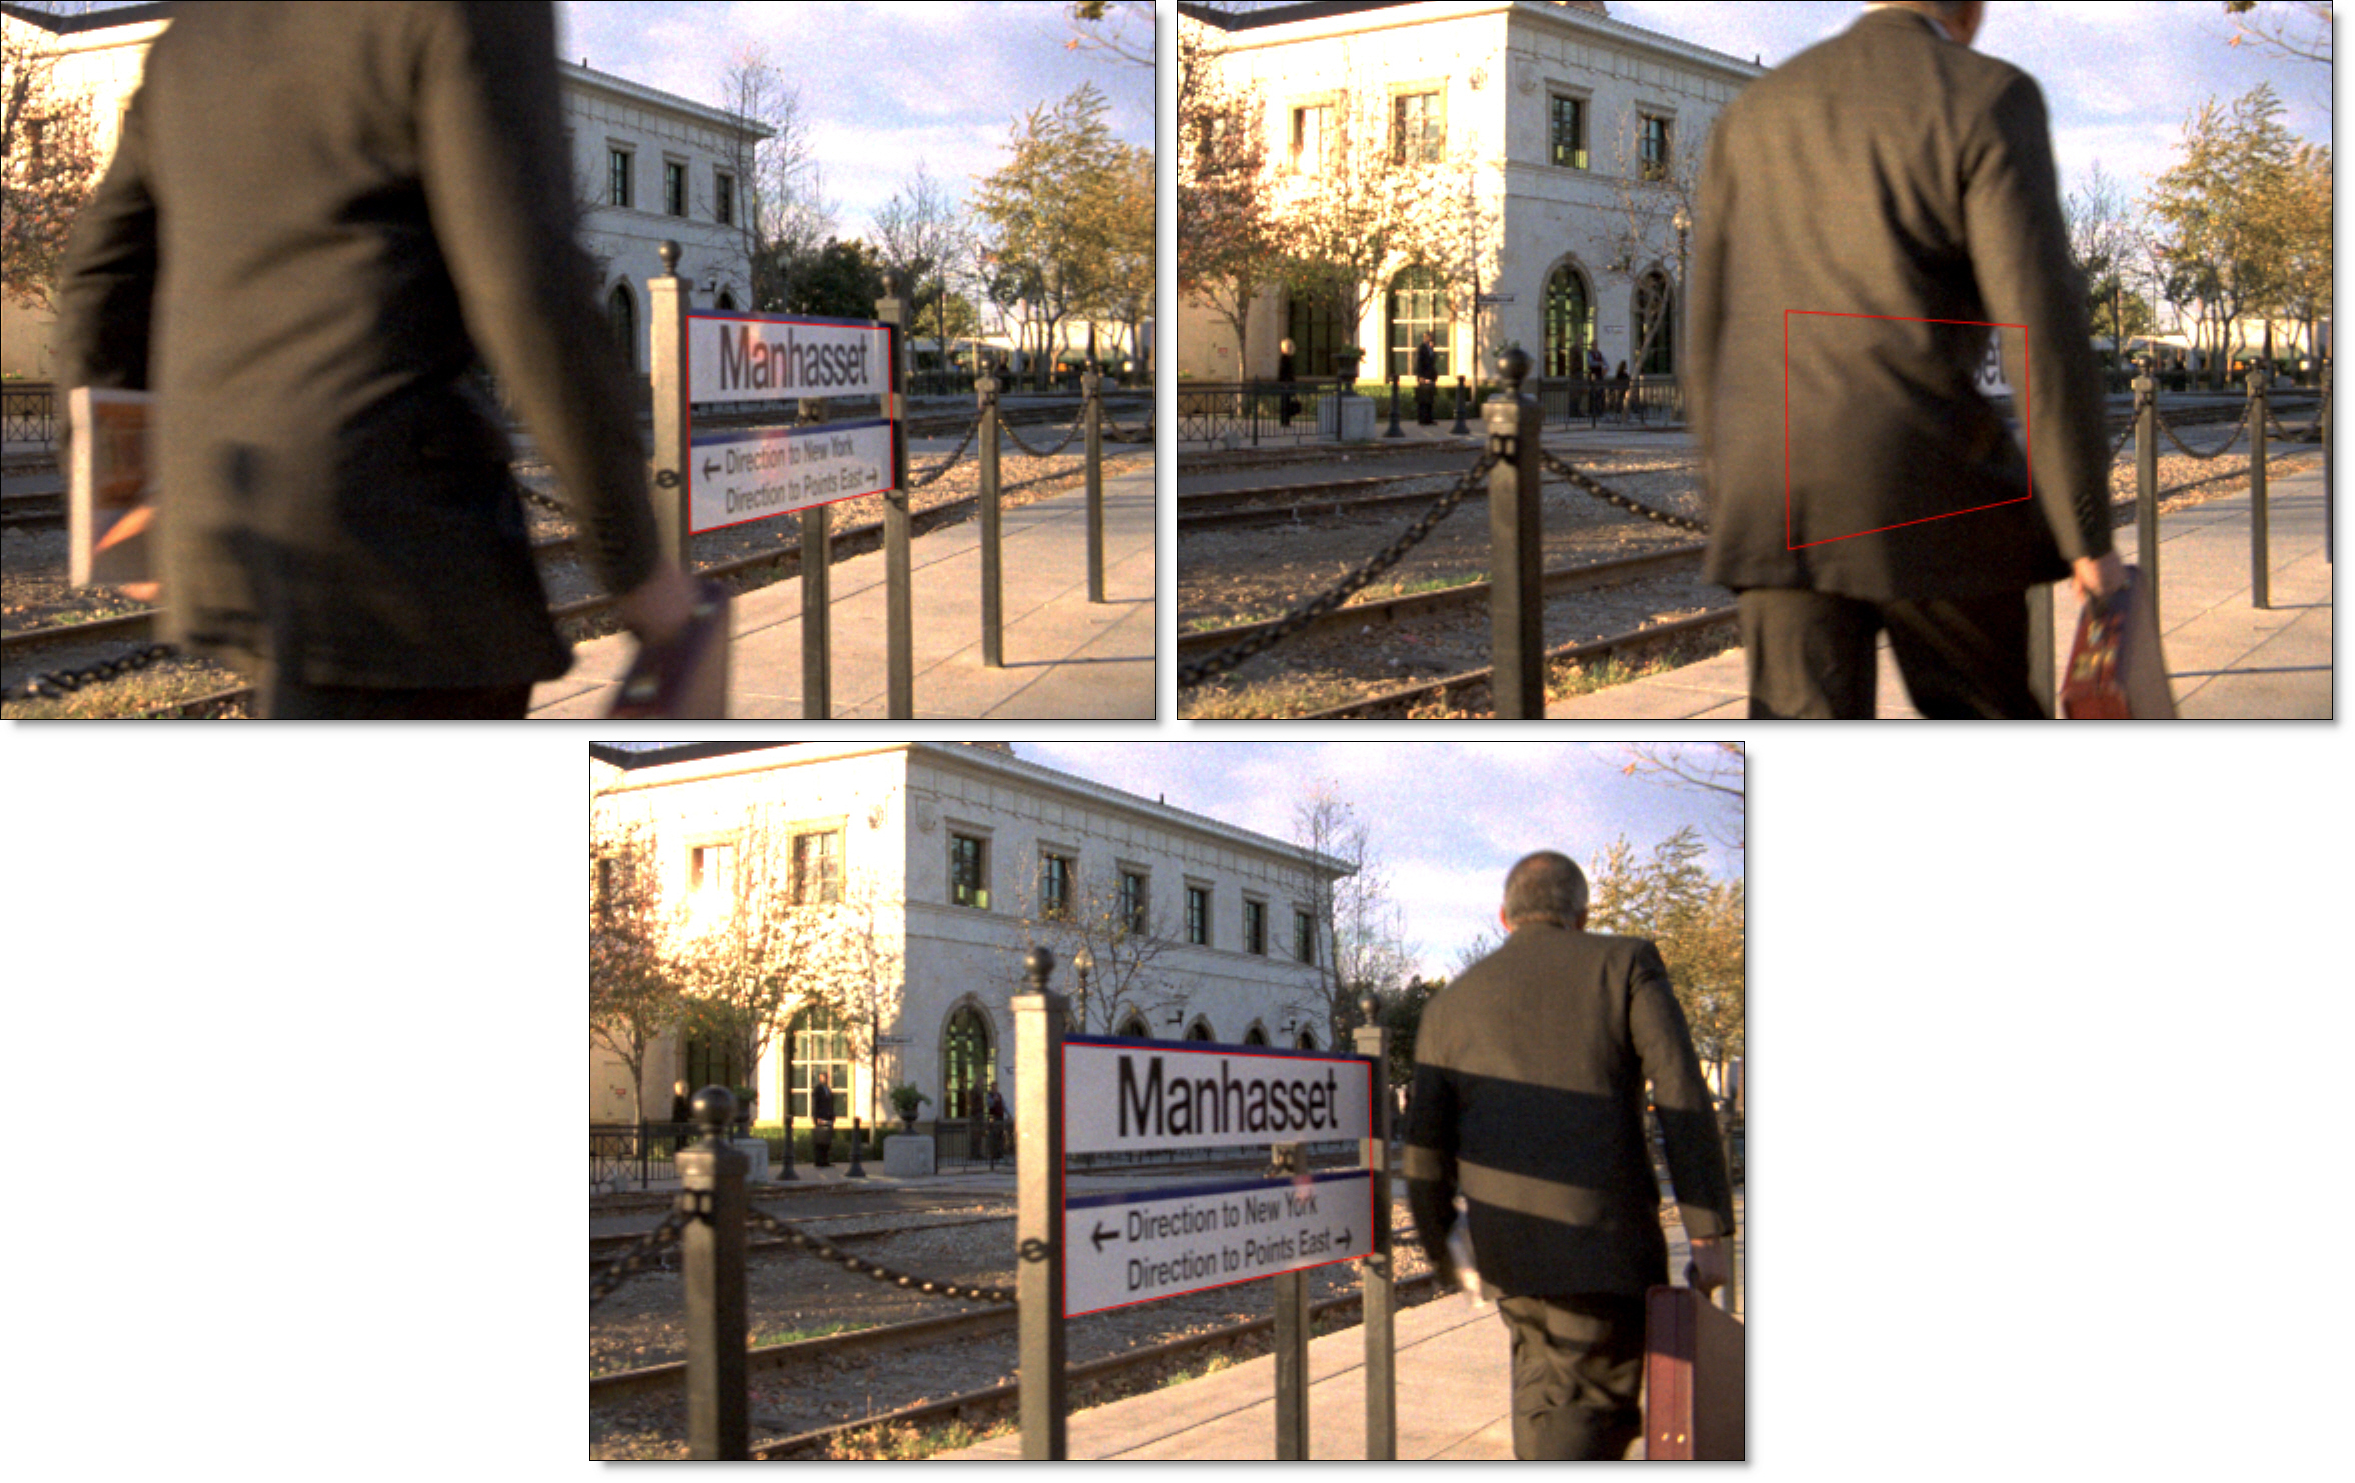
1 Track an object using either the Mocha or Planar tracker.
2 When the object you are tracking becomes obscured or the track fails, hit the Cancel button in the Tracker Progress window.
3 Back up to the last properly tracked frame.
4 Select the Timeline tab at the bottom left of the screen.
5 After this point in the Timeline, delete any Transform:Matrix keyframes for the tracked layer.
6 Click on Transform (T) in the Toolbar.
7 Set Transform keyframes for the selected layer at the last properly tracked frame by enabling the Animate icon for the layer parameters that you will be adjusting.
8 Move the Timebar forward to where the object you are tracking is no longer obscured and animate the layer parameters so that your shape matches the object you are tracking.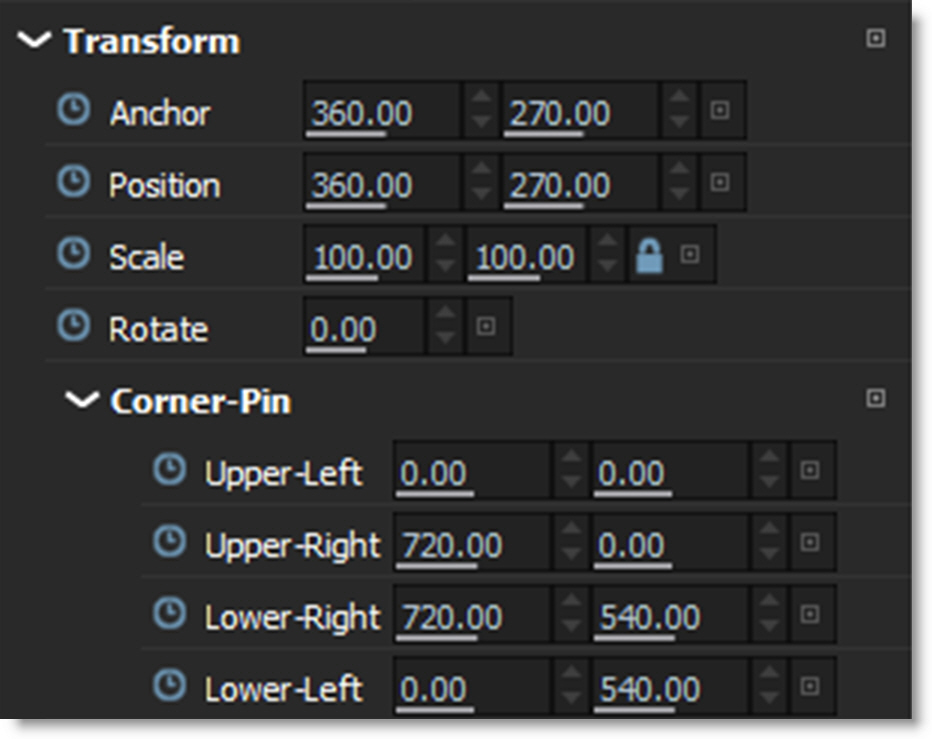
The manual keyframes you set take care of the animation of the object while the object was obscured.
9 Choose the Tracker (Shift-T) in the Toolbar.
10 If you are using the Planar tracker, press the Reset button to reset the track points to account for the new location. This sets a new Reference point.
11 Hit either the forward or backward track button depending on which direction you are tracking.
Smoothing Planar Tracked Layers
Smoothing planar tracked layers removes inaccuracies in the tracking data.
1 Select a layer which has been planar tracked.
Once selected, the layer displays tracking paths on the four corners and in the center of the frame.
2 Zoom into one of the tracking paths on a corner of the image.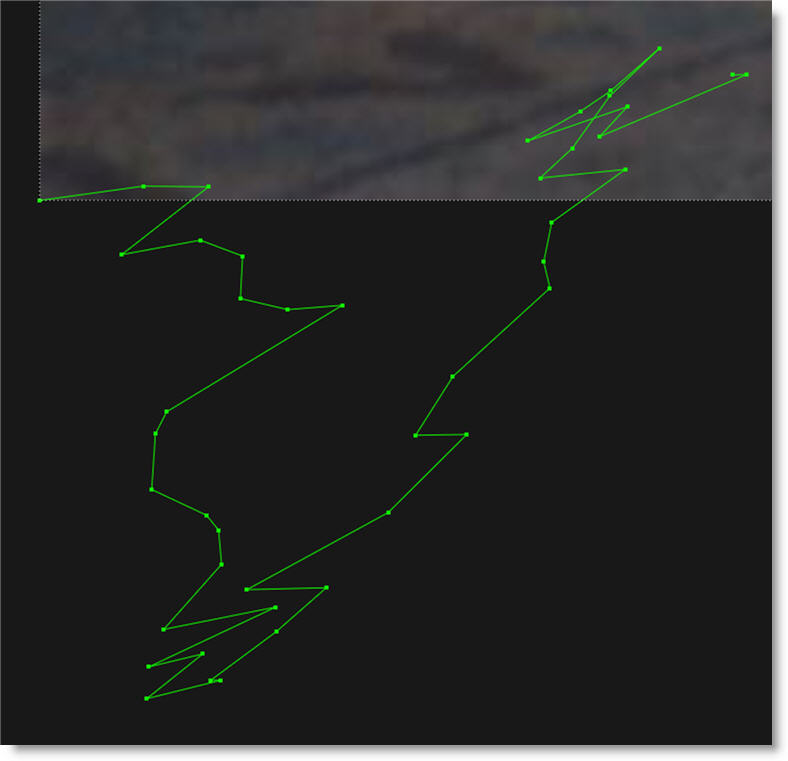
Viewing the path while adjusting the Smooth slider will provide visual feedback.
3 In the Tracker tab, choose Smooth and adjust the slider when it pops up.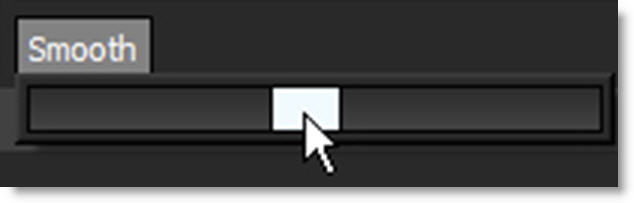
The planar tracked layer is smoothed.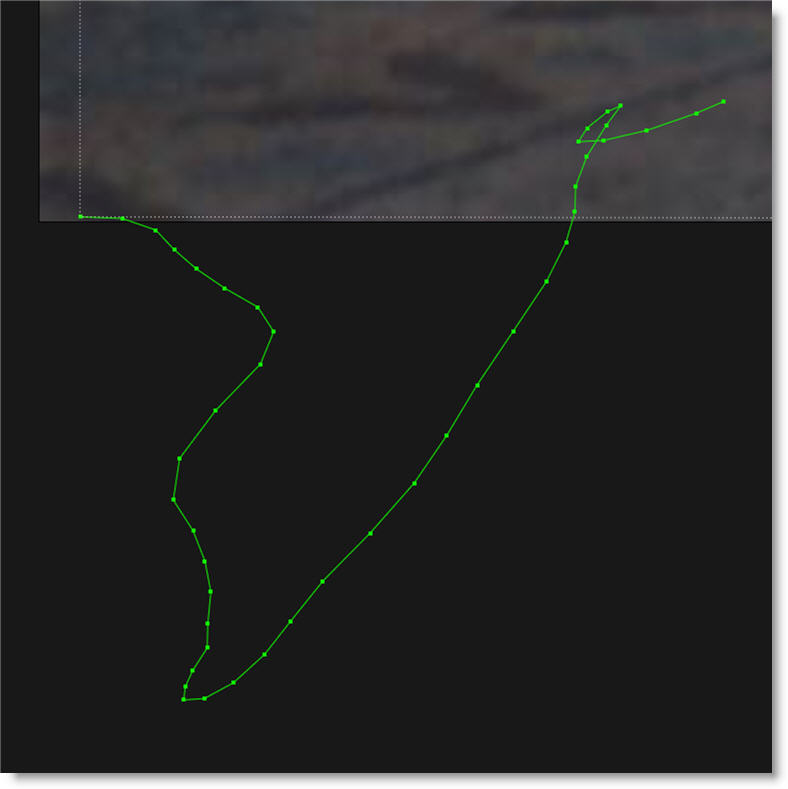
Group Tracking
Using the Planar tracker, multiple layers containing non-overlapping shapes can be tracked as separate planar surfaces.
1 Select multiple layers that contain non-overlapping shapes.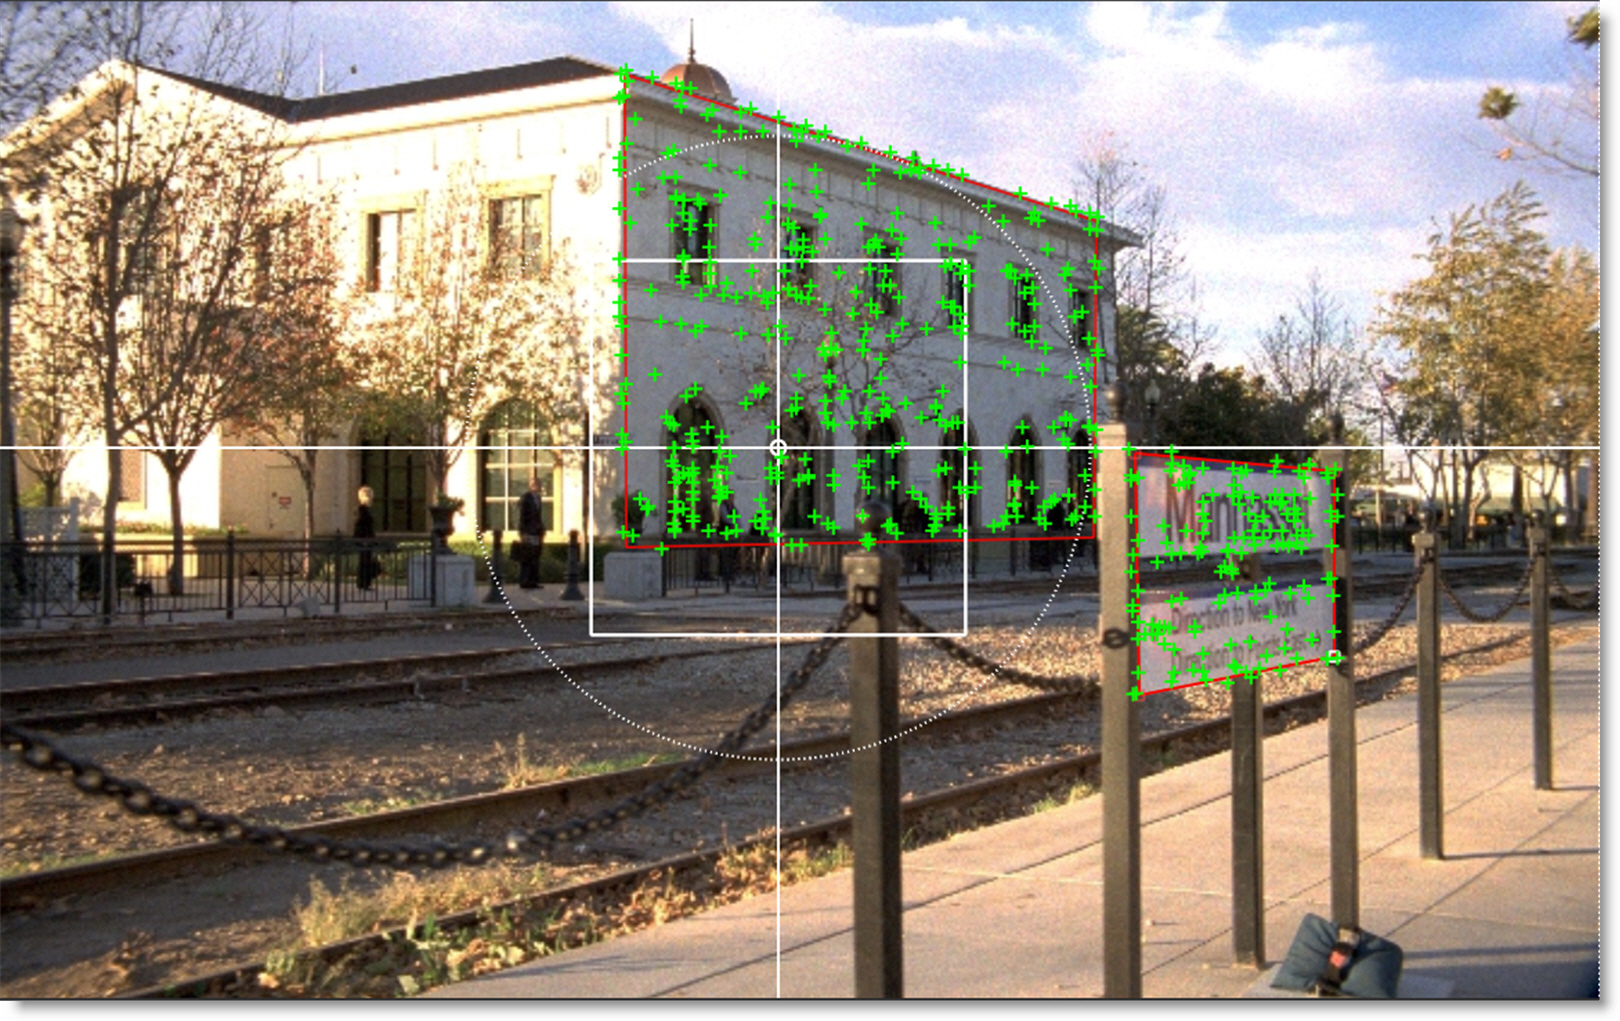
2 Track using the Planar tracker.
Each layer is tracked as a separate planar surface.
Part Tracking
Using the Planar tracker, Part Tracking uses multiple layers that contain overlapping shapes to aid in tracking non-planar surfaces.
1 Select multiple layers that contain overlapping shapes.
Make sure there is a good overlap between the shapes.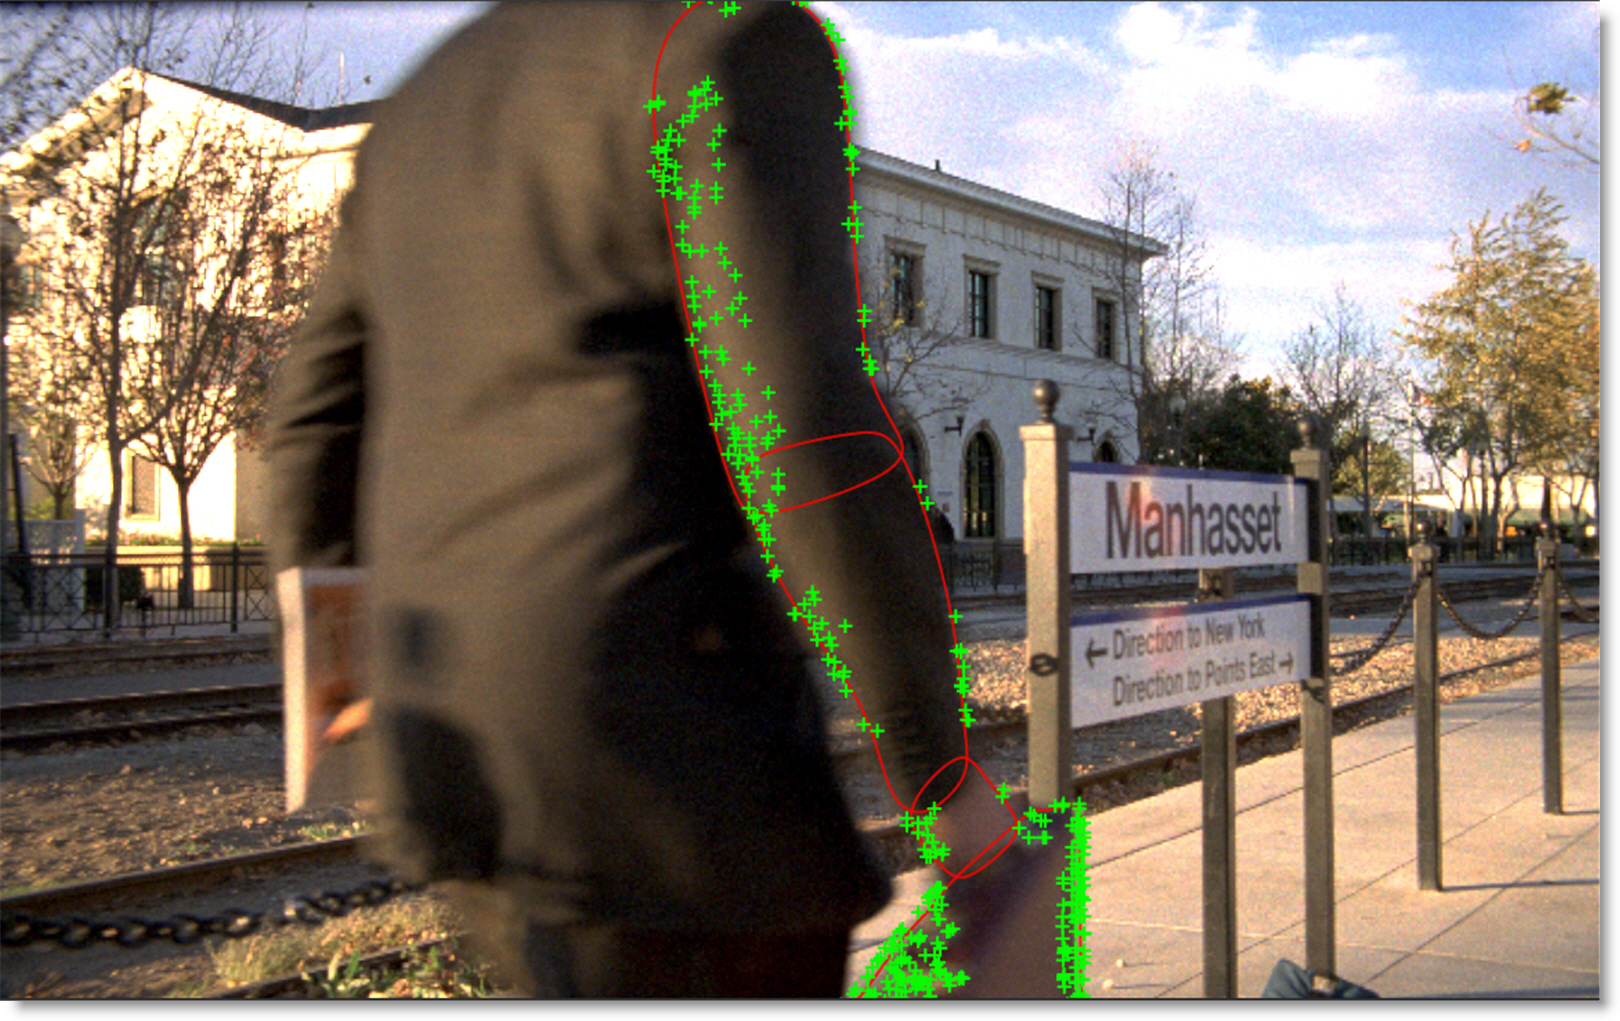
2 Track using the Planar tracker.
The overlapping shapes share coarse motion, but have individual motion at the fine scale. This is helpful when tracking non-planar surfaces.
Planar Tracking Tips and Tricks
If you have trouble tracking a shot using the planar trackers, here are some tips and tricks.
General Tips and Tricks
Scrub Your Timeline
When starting a track, go through your footage a few times to see what your best options are for tracking. You will save yourself a lot of time by making note of obstructions and possible problem areas in advance.
Change The Tracking Features
By default, Tracking Features is set to Auto which tracks corners, edges and ridges simultaneously and then automatically selects the best result. Changing from Auto to Corners, Edges or Ridges may yield a better result.
Switch The Motion Model
Perspective is the default motion model, but Affine (tracks translation, rotation, scale, and skew) or Translation (tracks the XY offset) may be better choices for your clip. In general, use Perspective for tracking larger shapes, Affine for medium shapes and Translation for small shapes.
Use Edges
When tracking surfaces, you will usually get a much better track if you include the edges and not just the interior of an object. This is because the planar trackers can define the difference between the background and the foreground and lock on better.
Track From The Largest, Clearest Point
In order for planar trackers to keep the best possible track, it is usually best to scrub through the timeline and find the largest and clearest area to begin tracking from, draw your shape there, then use backwards and forward tracking from that point.
For example, if you have a shot of a sign coming toward you down a freeway, it is usually better to start at the end of the clip where the sign is largest, draw your shape and track backwards, rather than start from the beginning of the clip.
A Planar Surface Does Not Necessarily Have To Be Flat
We have a Planar tracker which specifically tracks planes of motion, but this is not limited to tables, walls and other flat objects. Faces can be tracked very successfully around the eyes and bridge of the nose. Rocky ground, rumpled cushions, clumps of bushes, human torsos and curved car bodies are all good candidates. The key is low parallax or no obvious moving depth. When in doubt, try quickly tracking an area to see if it will work, as you can quite often trick the planar trackers into thinking something is planar.
Draw More Shapes
Remember you are not limited to one shape in a layer. Use a combination of shapes to add further areas or cut holes in existing areas to maximize your search.
Use Shapes Only For Tracking
You can use shapes for tracking purposes only and once the track is completed, you can hide or delete them.
Create Subtract Shapes
In some cases, there are parts of an image that can interfere with the effectiveness of the Planar or Mocha trackers. To handle this, you can create subtractive shapes in the area you are tracking.
Create a shape to subtract out areas of unwanted motion that may interfere with tracking and keyframe the shape as necessary. Place this shape above the layer that you are tracking and set the shape’s Blend mode to Subtract. Select the layer you are tracking and then add the subtract shape to the selection by using Ctrl/Cmd-click. Now when you track, the area within the subtract shape will be excluded.
Track From Different Points In Time
Depending on the motion of the object to be tracked, you may get better results if you track from the end to the beginning. You may also track from the middle to the beginning and then from the middle to the end.
Use A Different Channel To Track On
Change the Channel parameter from Luminance to Red, Green or Blue. The Channel parameter determines which image value the tracking algorithm uses.
Utilize The Pre-Processing Filters
Use the Blur, Sharpen, Contrast, Gamma, De-Noise or Remove Flicker pre-processing parameters.
Track The Foreground
Set the View to Foreground for the fastest speed when tracking. In the Foreground view, no processing occurs and therefore it is faster than View > Output.
There Is No Magic Bullet
The planar trackers are very flexible trackers and will save a lot of time, but you will eventually run into a piece of footage that just will not track. Large or continuous obstructions, extreme blur, low contrast details and sudden flashes can all cause drift or untrackable situations.
Mocha Tracker Tips and Tricks
In addition to the planar tracker Tips and Tricks previously mentioned, here is an important Mocha tracker tip.
When In Doubt, Ramp Up Your Pixels
You can quite often get a great result with the default settings, but if you’re getting a lot of drift, try setting the Min % Pixels Used value higher. The processing can be slower, but you will usually get a much more solid track.
Point Tracker
The Point tracker uses trackers which are placed on distinguishable image features. It offers two modes: Point Track ML and Classic. Point Track ML leverages machine learning to maintain tracking even through occlusion or when the object moves off-screen, while Classic mode gives you complete manual control.
Note: The Tracker is available as a separate node, but is also built into the Depth, Morph, Power Matte, Roto and Roto Blend nodes. This tutorial demonstrates the use of the Tracker from within the Roto node.
Creating a Tracker
1 Add a Roto node after the source image.
2 Select the Tracker (Shift-T) in the Toolbar.
3 Go to the frame where you want to start tracking.
4 Set the View to Foreground for the fastest speed when tracking. In the Foreground view, no processing occurs and therefore it is faster than View > Output.
5 In the Tracker window located at the bottom of the screen, select the Point tab.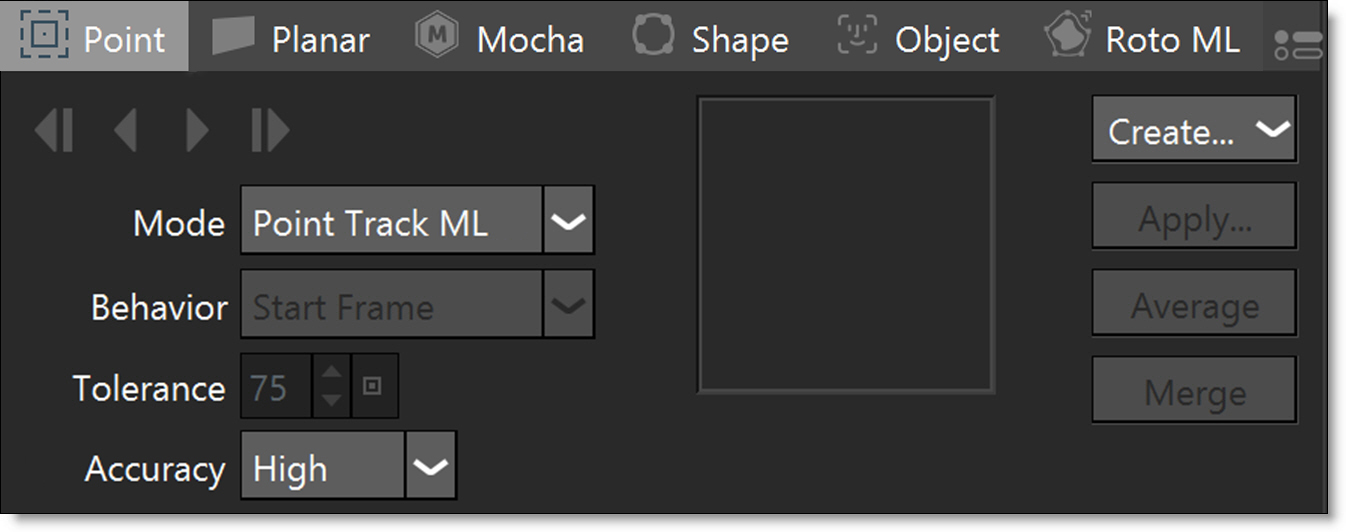
6 Press the Create button, select Point Tracker and a tracker is placed in the center of the image.
or
7 Alt-click on an open space in the image.
As you pass your cursor over the image with the Alt key depressed, a zoomed region to the right of the tracker aids in selecting your Match Area.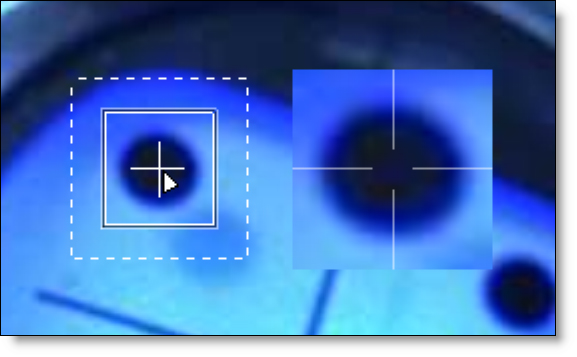
Moving Tracker Components
Components may be moved together or independently. In Point Track ML mode, simply position and size the tracker; other elements require no adjustment.
1 Clicking and dragging directly on the Track point will move all components of the Tracker: Match Area, Search Region and Track Point simultaneously.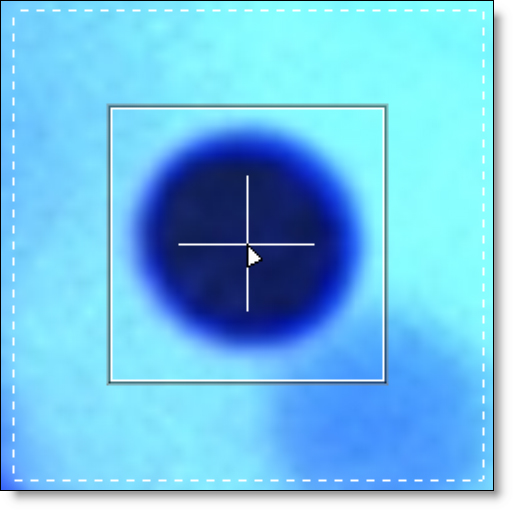
2 Clicking and dragging within the area of the Search Region will move only the Search Region.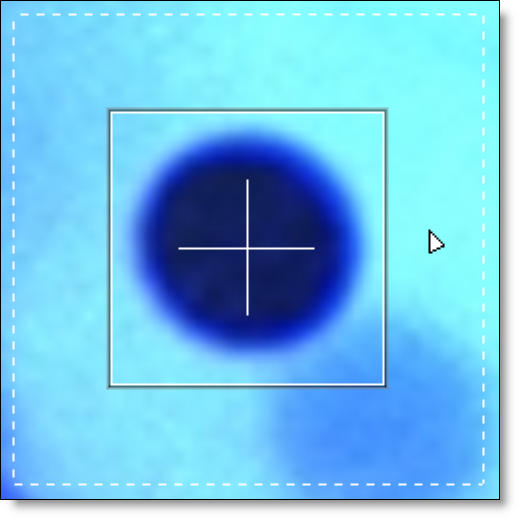
3 Clicking and dragging within the area of the Match Area will move both the Search Region and Match Area simultaneously, leaving the Track Point at its current location. This would be used for Offset Tracking when the original track point becomes obscured.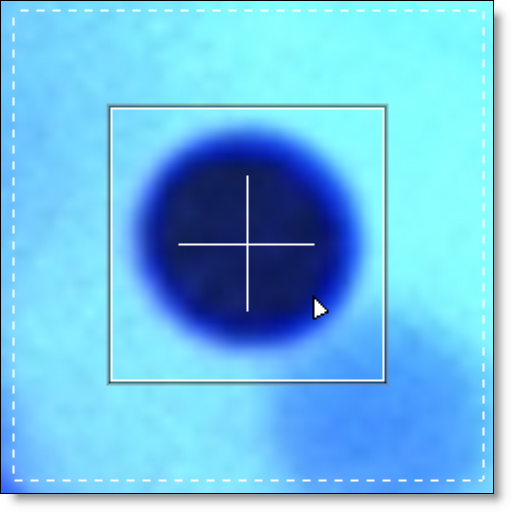
Scaling Tracker Components
1 Clicking and dragging on the corners of the Match Area bounding box scales both the Match Area and Search Region.
2 Clicking and dragging on the corners of the Search Region bounding box scales only the Search Region.
Tracking An Image In Point Track ML Mode
Point Track ML uses machine learning to track points despite occlusion or exiting the screen.
1 Set Mode to Point Track ML.
2 Adjust the size and position of the point tracker.
3 Hit either the forward or backward track button.
Silhouette analyzes and tracks motion frame by frame.
Tracking An Image In Classic Mode
Classic mode provides complete manual control during tracking.
1 Set Mode to Classic.
2 Adjust the size and position of the Match Area and Search Region.
3 Right-click on the tracker and select the color space to use in the Channel sub-menu.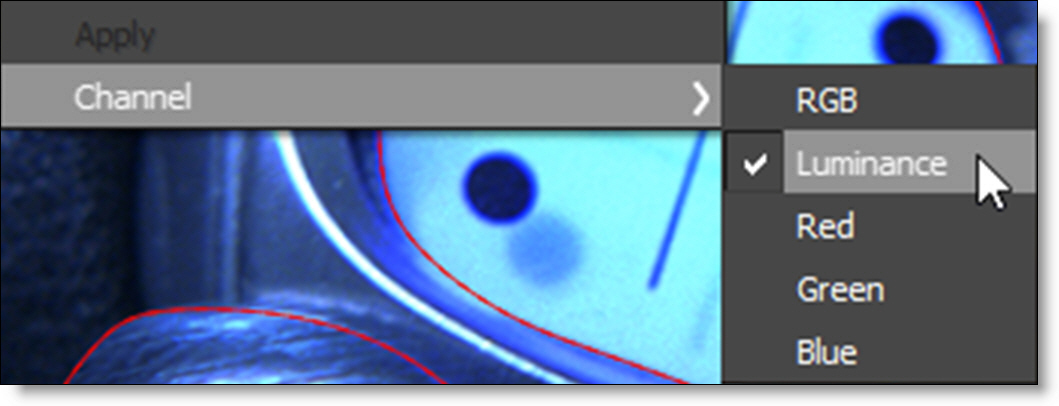
4 Hit either the forward or backward track button.
Silhouette analyzes and tracks motion frame by frame.
Offset Tracking
There are times when your original Match Area gets obscured, and in these instances, you can offset the Match Area and Search Region from the Track Point.
1 Create a tracker and track a portion of the clip until the Match Area becomes obscured.
2 Hit the Stop button in the Tracker Progress window.
3 Back up to the last properly tracked frame.
4 Click and drag somewhere within the Match Area and both the Match Area and Search Region will move simultaneously, leaving the Track Point at its current location.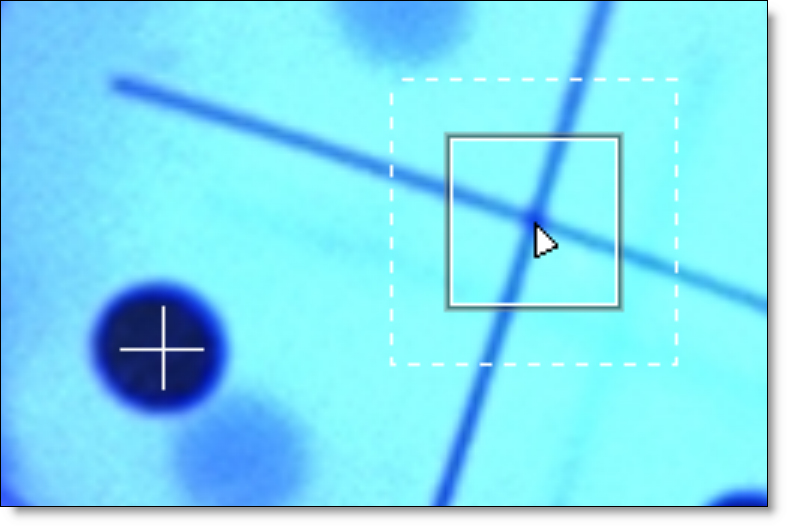
5 Click the forward tracking button to continue tracking.
The Track Point follows the same path, but the new Match Area is used to acquire the tracking data.
Tracking Difficult Shots
Some clips are difficult to track because of erratic motion or the occlusion of the feature that you are attempting to track. In these cases, you can do a bit of hand tracking using one of two methods:
• By pre-keyframing the tracker at various frames throughout the clip.
• Keyframing a shape and then creating tracker keyframes based on the shape’s motion.
Keyframing the Tracker
1 Create a tracker.
2 Adjust the tracker to match the object at various frames throughout the clip.
3 In the Tracker tab, change the Behavior to Key Frames.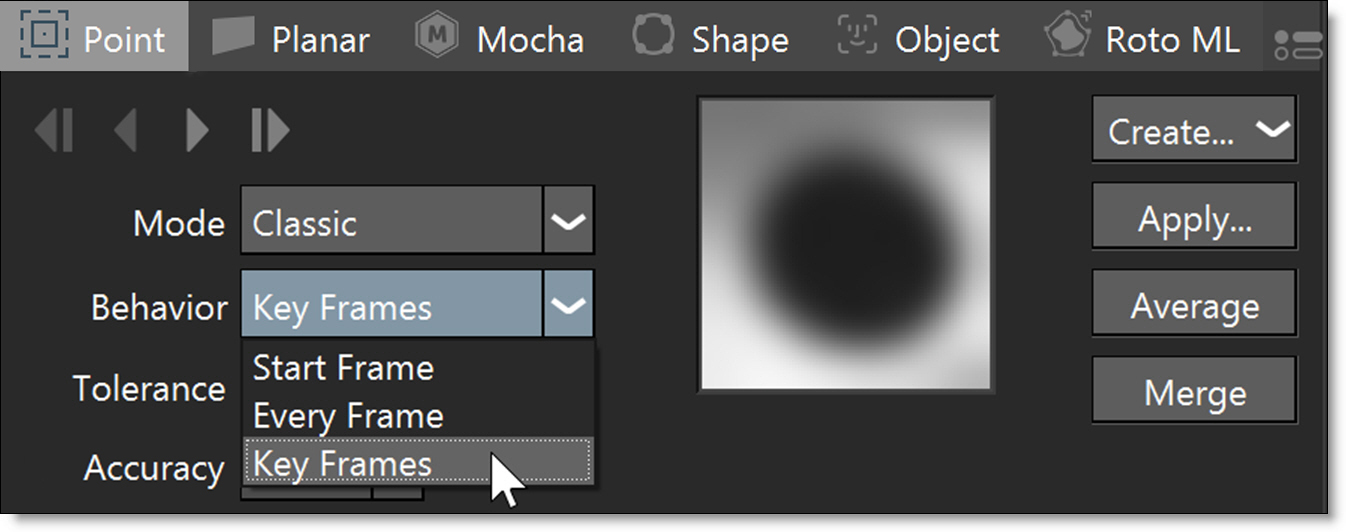
The Tracker Match Area will now use these keyframes as a reference while tracking.
Create Tracker from Shape Center
1 Create a shape around the feature that you would like to track. Go to various frames throughout the clip and adjust the shape to match the feature.
2 Select the Tracker tool and right-click on the shape.
3 From the pop-up menu, select Create Tracker from Shape Center.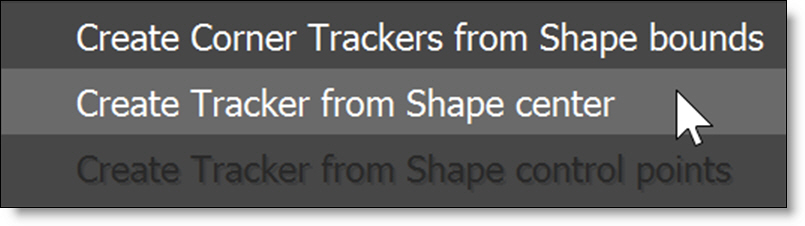
A tracker is automatically created around the center point of the shape and any shape keyframes are automatically applied to the Tracker.
4 In the Tracker tab, change the Behavior to Key Frames.
The Tracker Match Area will now use these keyframes as a reference while tracking.
Modifying Tracking Data
Averaging Trackers
Averages multiple tracks into a new destination track. A common technique is to track forwards from the first frame to the last, and then create a second track, tracking backwards from the last frame to the first. These two trackers are then averaged together to derive a more accurate track.
1 Select more than one tracker.
2 In the Tracker tab, choose Average.
A new averaged tracker is created.
Smoothing Trackers
Smoothing trackers removes inaccuracies in the tracking data.
1 Select a tracker to smooth.
2 Zoom into the tracker’s path.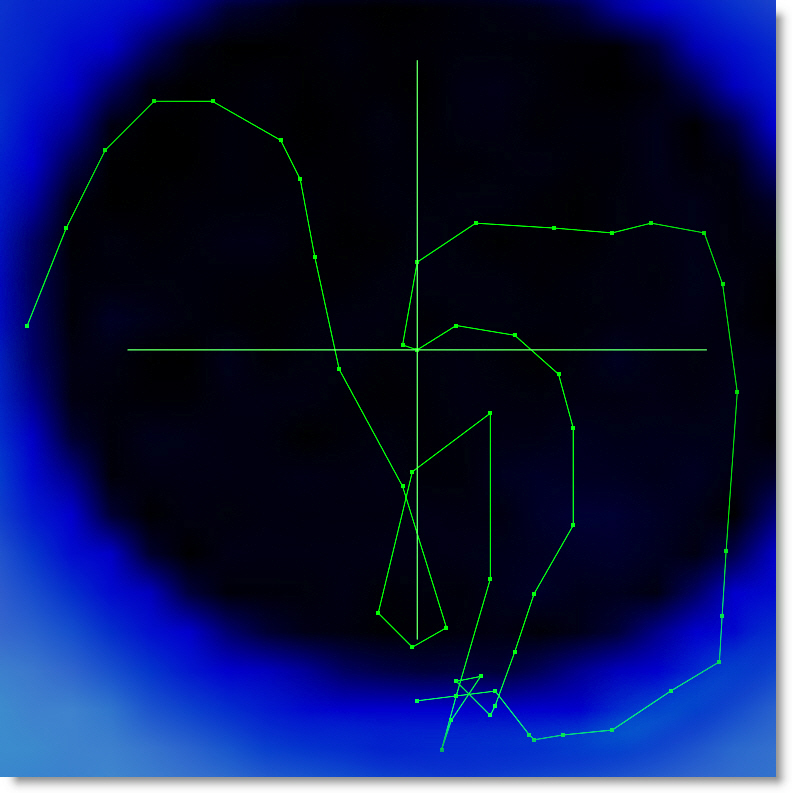
Viewing the path while adjusting the Smooth slider will provide visual feedback.
3 In the Tracker tab, choose Smooth and adjust the slider when it pops up.
The tracker is smoothed.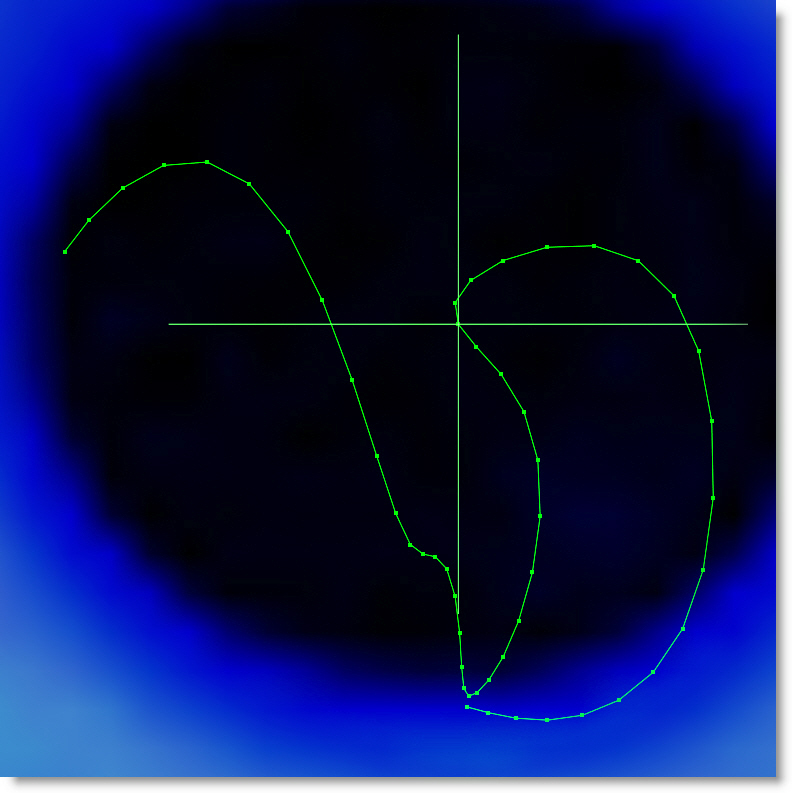
Merging Trackers
If you have multiple trackers that cover different frame ranges, they can be merged into one tracker, automatically compensating for the different offsets.
1 Select multiple point trackers that cover different frame ranges.
For instance, you may have one tracker that covers frames 1-25, another 25-75 and the last one from 75-100. Ideally, the trackers should overlap in time by at least one keyframe.
2 Click the Merge button.
A new tracker is created that covers the frame range encompassed by the three trackers.
Applying Point Trackers
Match Moving and Stabilizing Layers
In general, tracking data should be applied to layers instead of individual shapes. The tracking data is copied into the transform of a layer (containing shapes) allowing you to have separate keyframes for both the layer transformation and for the shapes. This results in far fewer shape keyframes than other methods and is the preferred way of working with clips in motion. The result is a very flexible method for discrete editing of layer and shape transformations.
Once applied to a layer, the tracking data can be used in Match Move or Stabilize mode. In Match Move mode, the clip moves as normal and the shape follows along according to the tracking data. In Stabilize mode, the clip is locked in place by stabilizing the Viewer. In either mode, you only need to keyframe the shape when it changes form.
1 Select the trackers that you would like to use.
2 Press the Apply button.
• With only trackers selected, clicking Apply creates a new layer and the tracking data will be applied to that layer.
• If a layer is selected along with the trackers, the tracking data will be applied to the selected layer.
You have a choice of applying position, scaling and/or rotation. However, scaling and rotation require two trackers.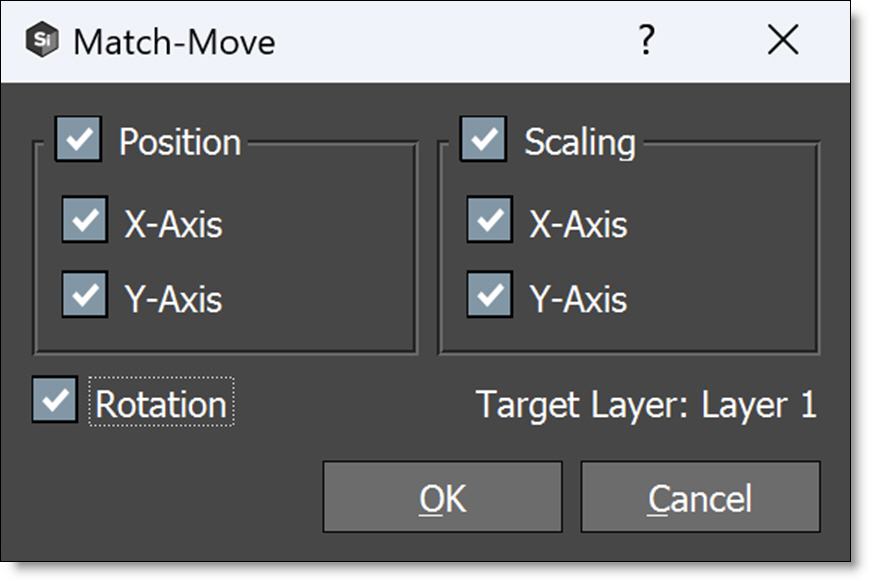
3 Select Position, Rotation and/or Scaling and click OK.
The tracking data is applied to the Layer > Transform > Matrix parameter.
4 Create a shape inside of the layer.
If you look at various frames in the clip, you’ll see that the shape is match moved to the motion of the image.
5 If you want to use Stabilization, click the Stabilize icon above the Viewer and choose either the Active Layer or a layer from the list. Available layers are organized by node.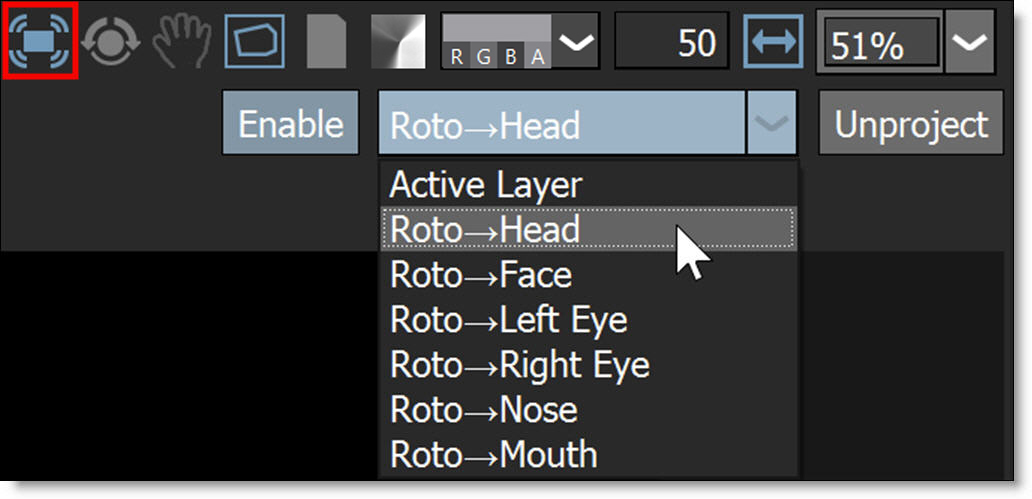
The Viewer is now stabilized based on the selected layer’s tracking data.
6 Make shape adjustments and keyframe the shape as necessary using the Reshape and Transform tools.
7 When shape editing is complete, click on the Stabilize icon and select None to turn it off.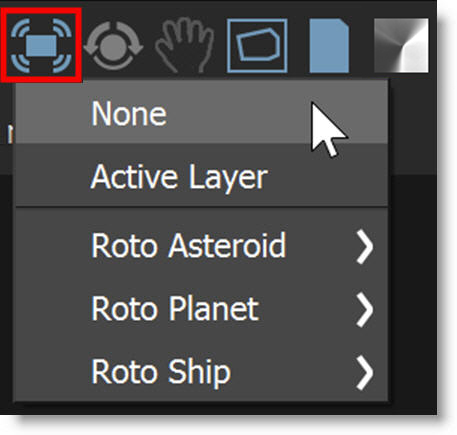
The Viewer is returned to its normal state.
Each layer can have different tracking data applied to it. Just go to the Tracker tab and apply the motion from other trackers to other layers.
Four Point Corner-Pin Tracking
Four-point tracking is traditionally used to match the perspective of a square or rectangular shape by tracking its four corners and applying a corner-pin transformation.
1 Create four trackers on the corners of a square or rectangular object and track the motion.
2 Create a layer in the Object List using the Add Layer icon.
The new layer is active and you can tell by the check mark icon in the box to the right of the layer name in the Object List.
Note: Point tracking data is only applied to the active layer.
3 Select the four trackers.
4 Press the Apply button.
The corner-pin data from the four trackers is applied to the layer.
5 Create a square shape inside of the selected layer. When drawing the shape, it should be placed near the location of the four trackers.
If you look at various frames in the clip, you’ll see that the shape’s motion is matched to the motion of the image.
Match Moving Points
Match moving applies the motion of a tracker to individual points on a shape.
Note: Match moving individual points results in keyframes being set on every frame of the shape and can make it cumbersome to later edit those points. This functionality has been added to Silhouette as some users prefer to work this way.
1 Select a tracker.
2 Click on a shape to select it and then select a point.
Note: To select points on a shape, you must first select the shape by clicking on the shape outline. Then, Ctrl/Cmd-click each point that you would like to select. Also, when a tracker overlaps a point, it will be difficult to select the point while in the Tracker. To select a point that overlaps a tracker, switch to the Reshape tool, select the point and switch back to the Tracker.
3 Right-click over a selected point and choose Apply from the pop-up menu.
The tracking data is applied to the point.
Point Tracker Tips and Tricks (Classic Mode)
If you have trouble tracking a shot using the Point Tracker in Classic mode, here are some tips:
• Set the View to Foreground for the fastest speed when tracking. In the Foreground view, no processing occurs and therefore it is faster than View > Output.
• Stop the tracker, go to the bad frame and reposition the Track Point, and hit the tracking button again. You don't need to go back to your start frame.
• Lower the Tolerance value, and track again from the beginning, or the frame before the bad frames. The lower the Tolerance, the more forgiving the tracker will be--but also less accurate.
• Start over and switch Behavior from Start Frame to Every Frame. This means that instead of trying to compare the tracking region with the first “pure” frame, it will try to match to the previous frame. If you re-track from the middle of a clip, it will consider your new start frame as your reference frame with either setting.
• Use the Blur, Sharpen, Contrast, Gamma, De-Noise or Remove Flicker pre-processing parameters.
• At any time, you can manually adjust the Track Point by simply grabbing it and putting it where you need to.
• Change the Channel parameter from RGB to Luminance, Red, Green or Blue and re-track. The Channel parameter determines which image value the tracking algorithm uses.
• A technique you can use to assist with difficult shots is to manually insert tracking keyframes. For example, if you have 100 frames to track, you can put in a keyframe every 5 or 10 frames by repositioning the Tracker. Once your keyframes are manually entered, return to frame 1 and set the Behavior to Key Frames. The tracker searches along the tracker's pre-existing motion path to find matching patterns.
• You can use the same technique as in the previous tip, but with the following differences. Create a shape around the feature that you would like to track. Go to various frames throughout the clip and adjust the shape to match the feature. Select the Tracker tool and right-click on the shape. From the pop-up menu, select Create Tracker from Shape Center. A tracker is automatically created around the center point of the shape and any shape keyframes are automatically applied to the tracker. In the Tracker window, change the Behavior to Key Frames. The tracker Match Area will now use these keyframes as a reference while tracking.
Shape Tracker
The Shape Tracker uses machine learning to track roto shapes from your keyframes. It follows motion inside the shape, deforms the shape to match that motion, and can optionally align its outline to a propagated matte. This lets shapes stay locked to subjects that change form as they move, such as clothing or limbs.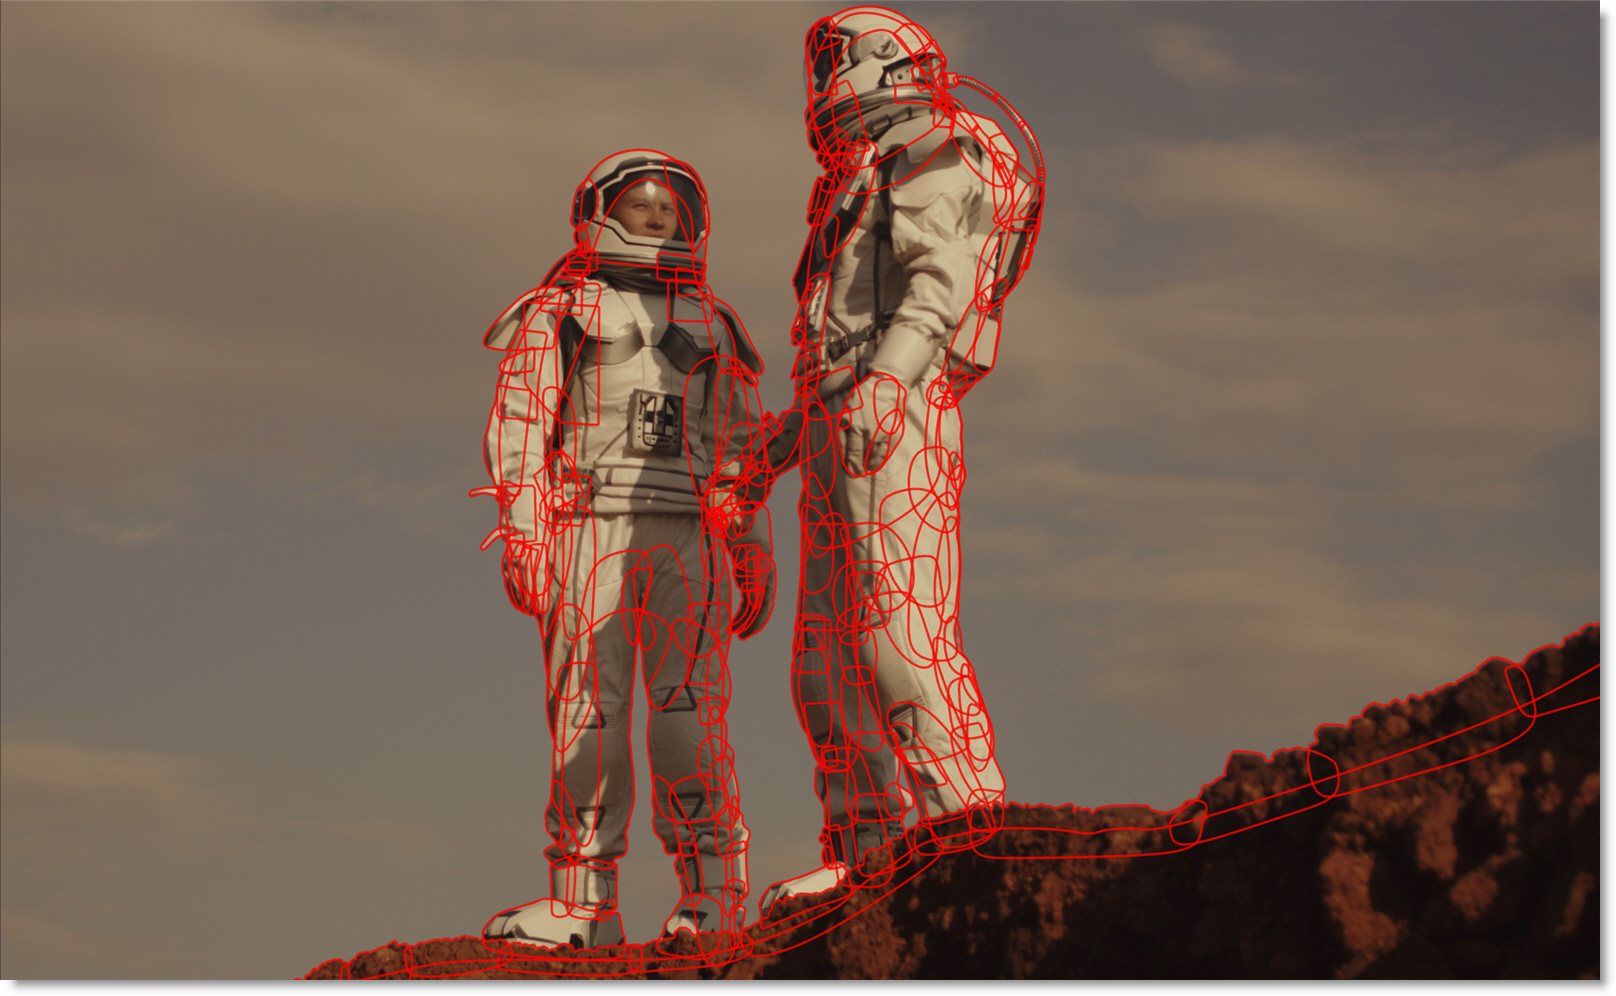
Using The Shape Tracker
1 Connect your footage to the Roto node's image input and make the Roto node active.
2 Go to a frame where the subject is clearly visible, then draw one or more closed shapes around the specific regions you want to track and place them inside a layer. Use separate layers for distinct body parts or object components so each area can be tracked and managed independently.
3 Add Sparse Guide Keyframes. Move through the shot and adjust the shapes at key moments, such as major pose changes, occlusions, or rapid movement. Add keyframes as needed. The shapes can also be tracked to reduce the number of keyframes required.
4 Select the shapes in the Object List.
5 Select the Tracker using Shift-T and choose the Shape tab.
6 Set the session work range to modify the tracker start and end frames.
7 Click Track.
Using A Matte Input
If the points don’t follow the edge of the object as expected with the default settings, use a Matte Input and optionally enable Roto ML.
1 Connect a matte describing the subject to the Roto node's Matte input. For example, use a Mask ML > Matte Assist > Matte Refine chain or a Matte ML node.
2 Select the shapes to track.
3 Enable Snap points and Use Matte input.
4 Optionally enable Use Roto ML which uses its own snapping method, different from Snap Points, to pull each point onto the matte’s boundary.
5 Click Track.
Shape Keyframes
The Shape Tracker distinguishes between Manual and auto shape keyframes.
• Manual keys: Manual keys created manually by the artist. These provide the reference shapes for tracking.
• Auto keys: Auto keys generated by tracking. These can be regenerated or removed by simplification.
Ordinary tracking and simplification preserve manual keys. Editing an auto shape key promotes it to a manual key, allowing your correction to guide later tracking passes.
With multiple manual keys, it also tracks the intervals between consecutive manual keys. Estimates from both ends of an interval are blended to follow the motion while meeting your reference shapes.
Correcting The Track
1 Review the tracked animation and locate a frame where the outline needs correction.
2 Adjust the shape to match the subject. The edited key becomes a manual reference.
3 Select the shapes and click Track again.
4 Repeat as needed, adding corrections around changes in pose, occlusion, or difficult motion.
The tracker regenerates automatic keys using the updated manual references. You do not need to remove the previous auto keys before retracking.
Object Tracker
The Object Tracker uses machine learning to detect human bodies, faces or license plates.
Body ML
Automatically generates layers and shapes for each major body part and tracks their motion and deformation throughout the shot. It produces basic tracked shapes that you can then refine and finalize using Roto ML.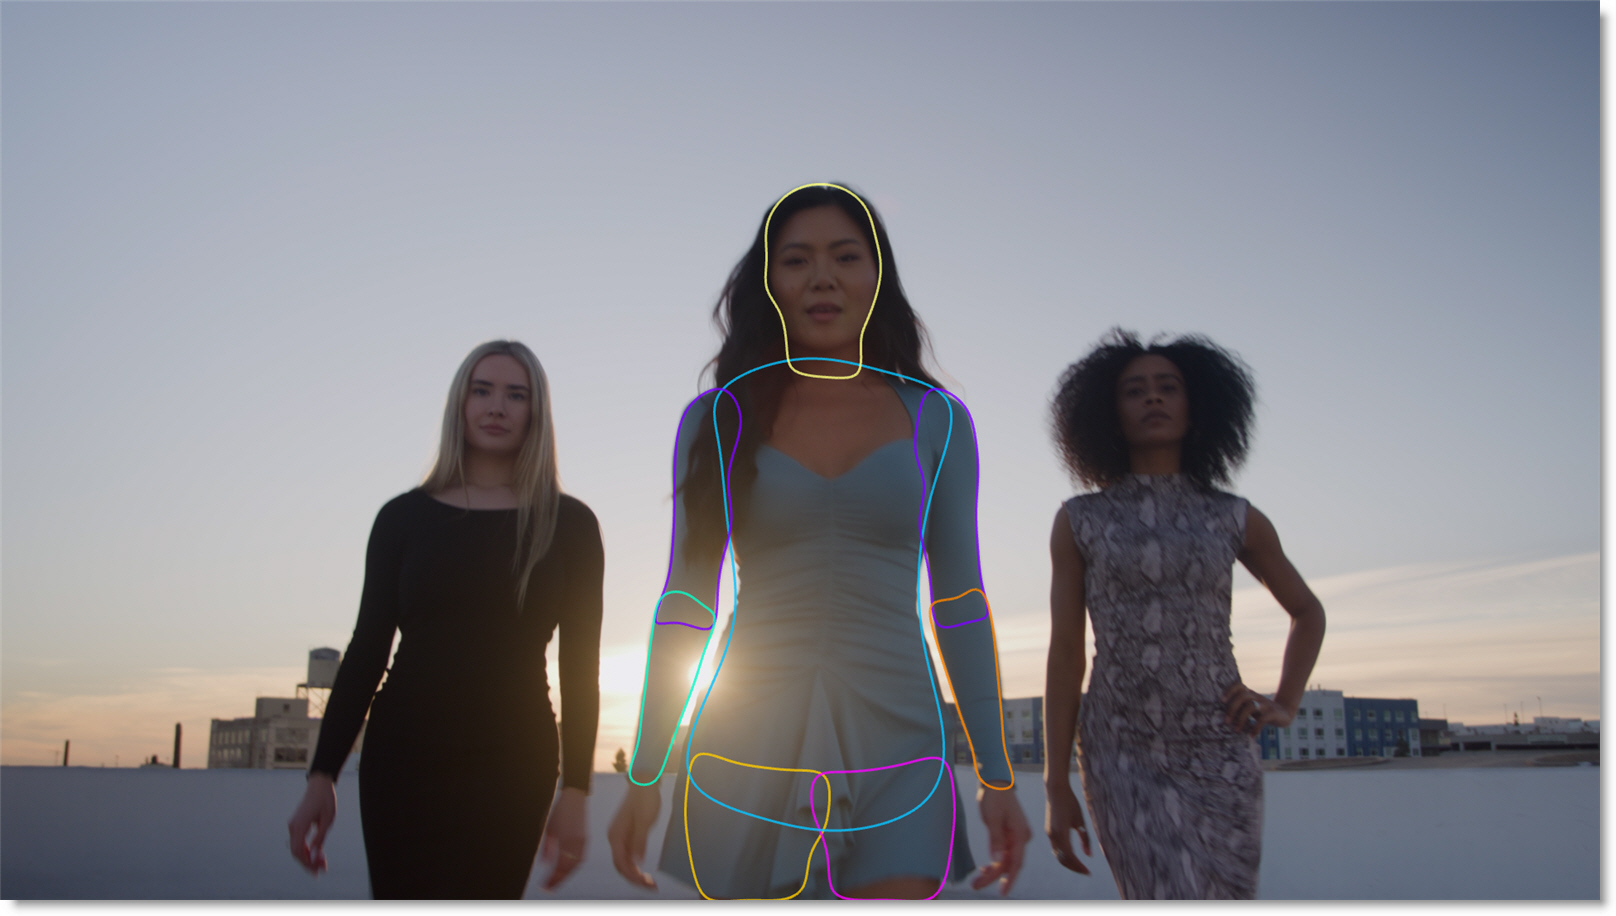
1 Select Body ML as the Object Type.
2 Click the Create Matte ML node button.
This automatically adds a compound node containing Mask ML, Matte Assist ML, Matte Refine ML, and Matte Deflicker ML connected to the source and Roto node.
3 Create a matte for the body to be tracked by following the Matte ML tutorial.
4 In the Roto node, click the Tracker tool and then the Object tracker.
5 Select Track.
The tracked shapes produced by Body ML are designed to follow the underlying body parts rather than clothing or hair. After tracking, you can refine these shapes using Roto ML, which fits them to the true object boundaries based on the ML-generated matte.
Face ML / License Plate ML
Each detected face or license plate is added to a new layer that can then be tracked. If additional faces or license plates enter the frame mid-track, new shapes and layers are created automatically.
1 Select either Face ML or License Plate ML as the Object Type.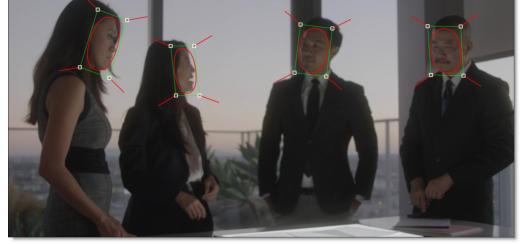
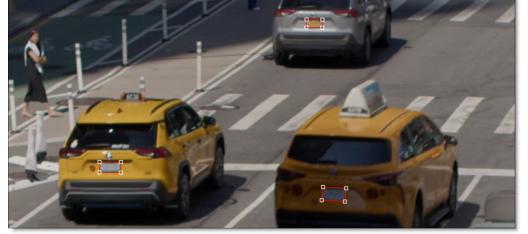
2 Set the Shape to either Oval or Rectangle.
3 Click Detect Objects.
Each detected object is added as a shape to a new layer, selected and ready to be tracked.
4 Click the Track Forward button and if additional faces or license plates enter the frame mid-track, new shapes and layers are created automatically.
Roto ML
Roto ML uses machine learning–generated mattes to automatically fit and refine roto shapes. This tutorial demonstrates how to prepare guide shapes, generate an ML matte, run Roto ML, and finalize the result.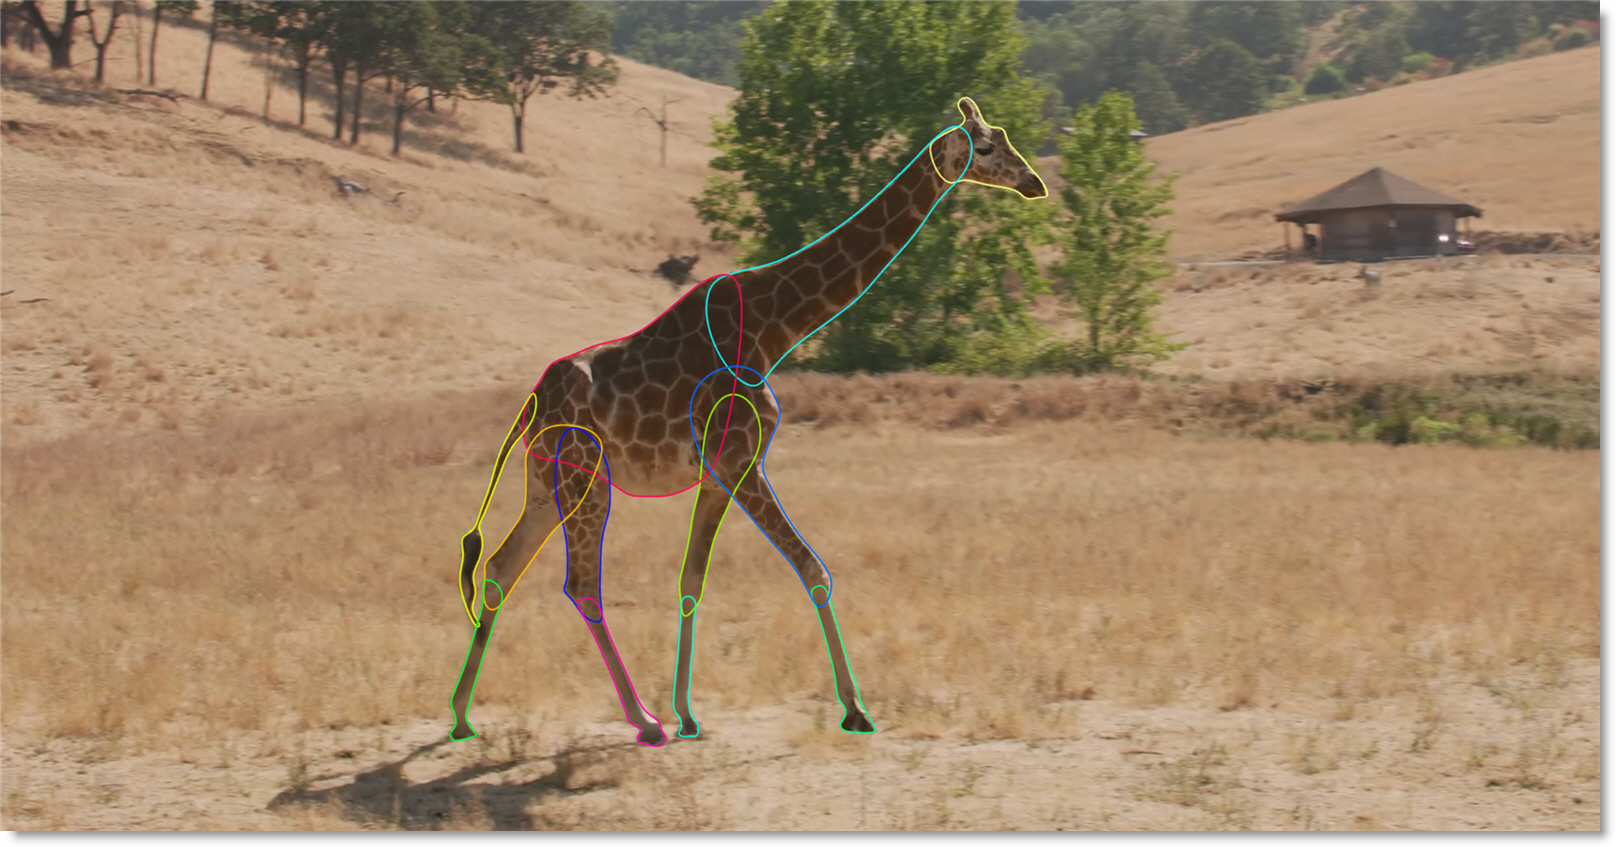
In this tutorial, you will learn how to:
• Generate rough shapes for humans and non-human objects
• Add initial and sparse guide keyframes
• Create an ML matte
• Track shapes
• Refine and simplify the result
Draw Rough Shapes
Human Bodies
1 Add a Roto node after the source node and select the Tracker tool.
2 Use Object Tracker > Body ML to automatically generate layers and shapes for each major body part and track their motion and deformation throughout the shot. See the Body ML tutorial for more information.
Body ML generates basic tracked shapes that follow the underlying body parts. These shapes act as the starting point for Roto ML, which then fits them to the actual object boundaries using an ML-generated matte.
Objects Other Than Humans
1 Create a shape around the object and place it in a layer.
2 Add additional shapes and layers as needed.
Add Sparse Guide Keyframes
1 Move through the shot and adjust the shapes at key moments, such as:
• Major pose changes
• Occlusions
• Rapid movement
• Direction changes
2 Add keyframes as needed.
3 Shapes can also be tracked to reduce the number of keyframes.
Add a Matte ML Node And Create A Matte
1 Click Create Matte ML Node which automatically adds a compound node containing Mask ML, Matte Assist ML, Matte Refine ML, and Matte Deflicker ML nodes.
Matte ML generates the matte that Roto ML uses to fit the shapes.
2 Matte the object you intend to rotoscope by following the Matte ML tutorial.
3 If the edge shows frame-to-frame instability, enable Matte Deflicker ML to smooth temporal jitter.
Track And Shape Fitting
In the Roto node, open the Roto ML tab and click Track. Track fits the layer’s shapes to the actual object boundaries of the ML-generated matte across the selected frame range.
Review the Result
Scrub or play through the shot, checking:
• Edge accuracy
• Fast motion
• Occlusions
• Direction changes
• Frames where the object changes direction
• Identify any areas where the fitted shapes drift or lose the object.
Correct Problem Areas and Refine
1 Adjust shape keyframes wherever the fitted shapes deviate from the object.
2 After making corrections, click Refine to fine-tune the shapes and improve consistency across the shot.
Simplify Points / Keyframes
Use Simplify > Points and Simplify > Keyframes to reduce the number of shape points and keyframes. This can make the animation easier to manage, but fewer points or keyframes may reduce precision.
Perform a Final Review
1 Play the full frame range at normal speed.
2 Make any final adjustments to keyframes or refinements to ensure the roto is clean, stable, and ready for downstream compositing.
Stabilize and Match Move Workflow
A common visual effects workflow is to first stabilize the camera motion, composite elements on the locked down plate and then match move to restore the original motion. The downside of this approach is that the image is filtered twice resulting in some slight image degradation, but nothing a bit of sharpening won’t solve.
A novel twist on the stabilize/match move workflow is Silhouette’s Viewer stabilization which non-destructively stabilizes the Viewer. The beauty of this approach is that image pixels are not modified during stabilization--only the Viewer is stabilized.
Viewer Stabilization
1 Select the Stabilize icon above the Viewer and the Stabilize toolbar appears.
2 Choose a layer, point tracker, or card from the list and select Enable.
The Viewer is now stabilized based on the selected object’s tracking data. Clicking the Stabilize icon again hides the Stabilize toolbar, but stabilization remains active until disabled.
3 Roto, paint and composite while stabilized.
Optionally, you can enable Stabilize > Unproject which remaps the area inside the layer or card so that it becomes flat--making it easier to work with pixels that have a regular repeating pattern or tend to be more horizontal or vertical. It's most useful to help correct for foreshortened projected pixels. For example, imagine you're the camera and you reposition yourself to look head-on into an area of the image that has perspective.
4 To disable Viewer stabilization, click the Stabilize icon if it is not highlighted and deselect Enable.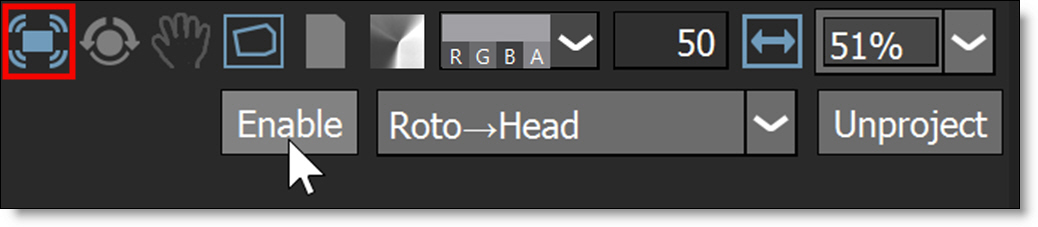
The Viewer is returned to its normal state.
5 Click the Stabilize icon again to close its toolbar.
Image Stabilization
Image stabilization is achieved using the Transform node. When the Data output of a Roto, Tracker, Mocha Pro or SynthEyes node is plugged into another node’s Data input (Paint, Transform and others), the tracking data in the transformed layers or cards is available to stabilize.
Note: When using a tracked card from the SynthEyes node as the stabilization source, the tracking steps below are not necessary.
1 In the Trees window, add a Transform node from the Nodes > Transform group and connect it to the source node.
2 Drag a Tracker node from the Nodes > Transform group onto the source node.
A new branch is created.
3 Connect the Tracker’s Data output into the Transform node’s Data input located at the top right of the node.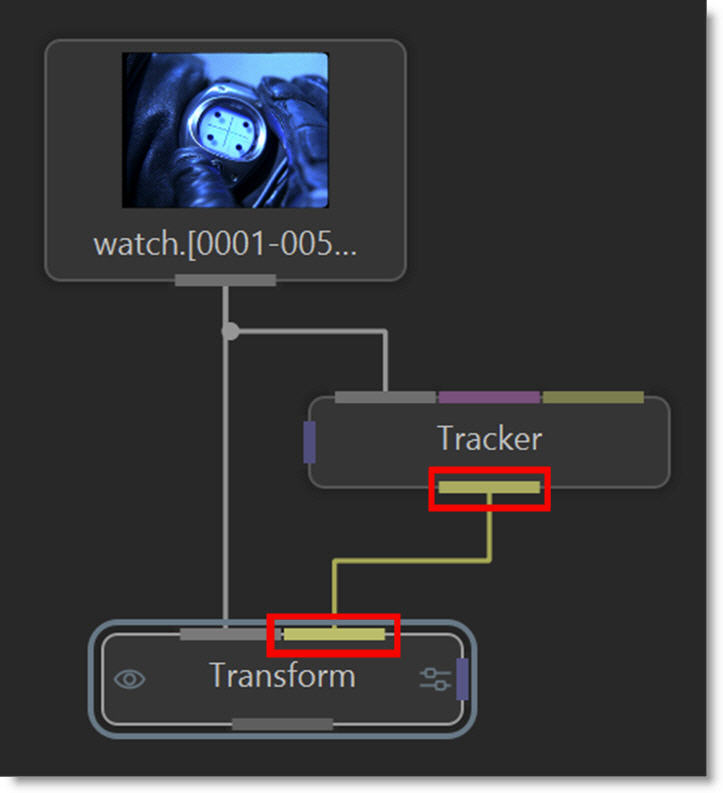
The Data ports are colored yellow.
4 Single-click in the center of the Tracker node to view and edit it.
5 Track an object and apply the tracker to a layer.
6 Single-click in the center of the Transform node to view and edit it.
7 Select a point tracker or tracked layer from the Transform > Transform pop-up menu.
8 Choose Stabilize in the Transform > Mode pop-up menu.
The tracking data from the selected layer is applied to the image and it is stabilized.
9 If you’d like, you can now add various elements to the stabilized image.
10 To reapply the clip’s original motion, copy the original Transform node used to stabilize the image, paste it after the added elements, and hook the Tracker node’s Data output into the new Transform node’s Data input.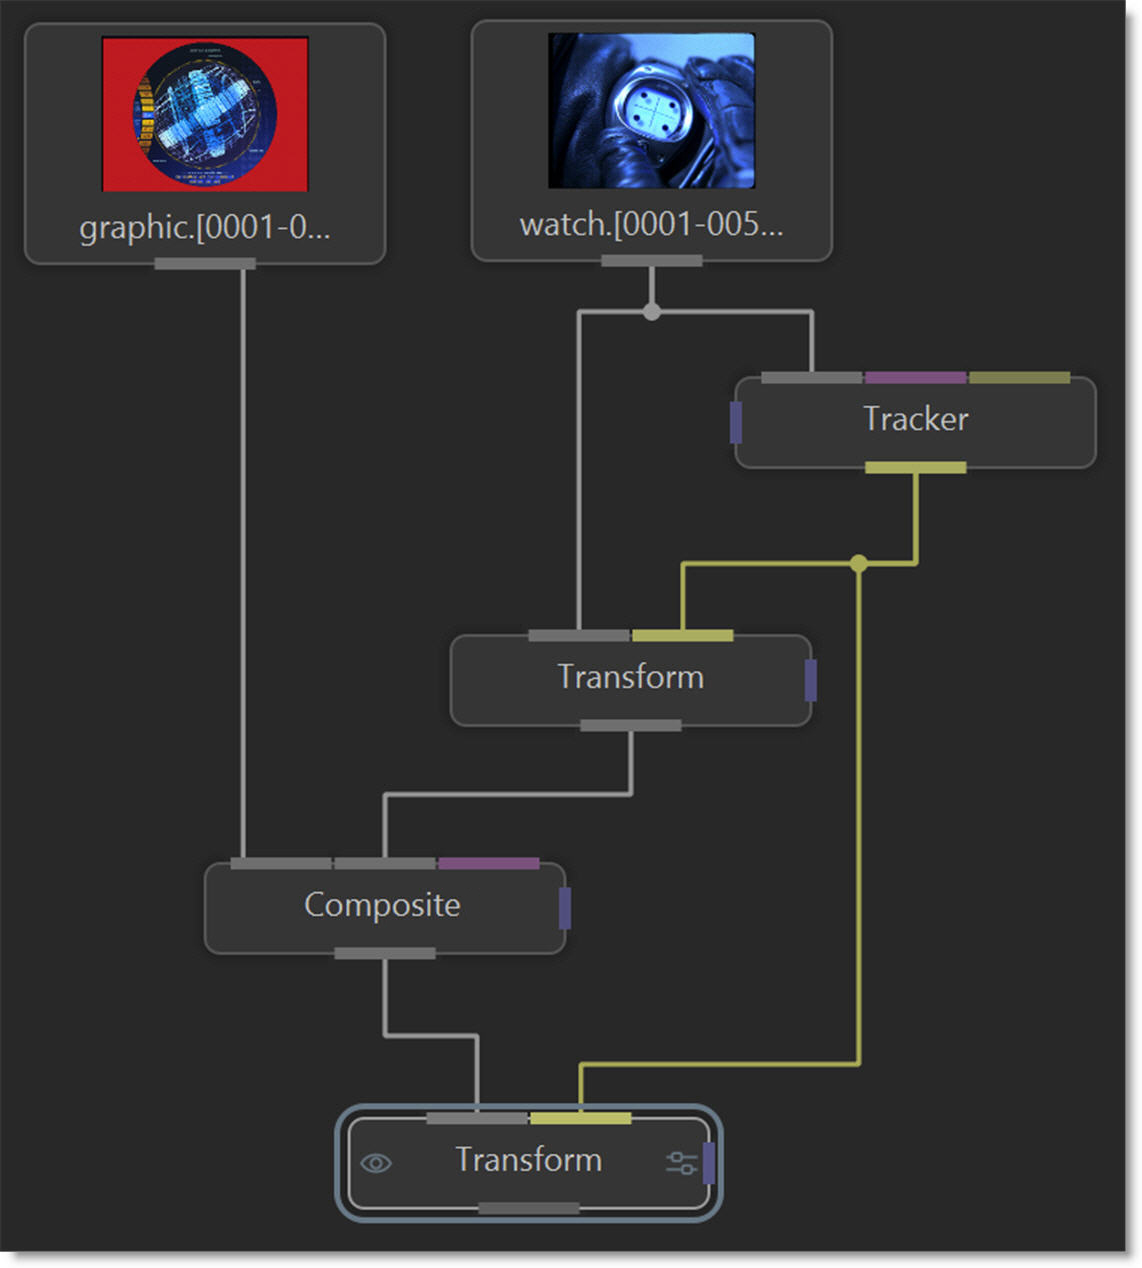
11 Change the new Transform node’s Transform > Mode from Stabilize to Match Move.
The image now has the original motion applied to it. Images can also be match moved without being previously stabilized.
Match Move
Match moving is achieved using the Transform node. When the Data output of a Roto, Tracker, Mocha Pro or SynthEyes node is plugged into another node’s Data input (Paint, Transform and others), the tracking data in the transformed layers or cards is available to match move.
Note: When using a tracked card from the SynthEyes node as the match move source, the tracking steps below are not necessary.
1 In the Trees window, drag a Tracker node from the Nodes > Transform group onto the source node you want to track.
2 Add a Transform node from the Nodes > Transform group and connect it to the source node you want to match move.
3 Connect the Tracker’s Data output into the Transform node’s Data input located at the top right of the node.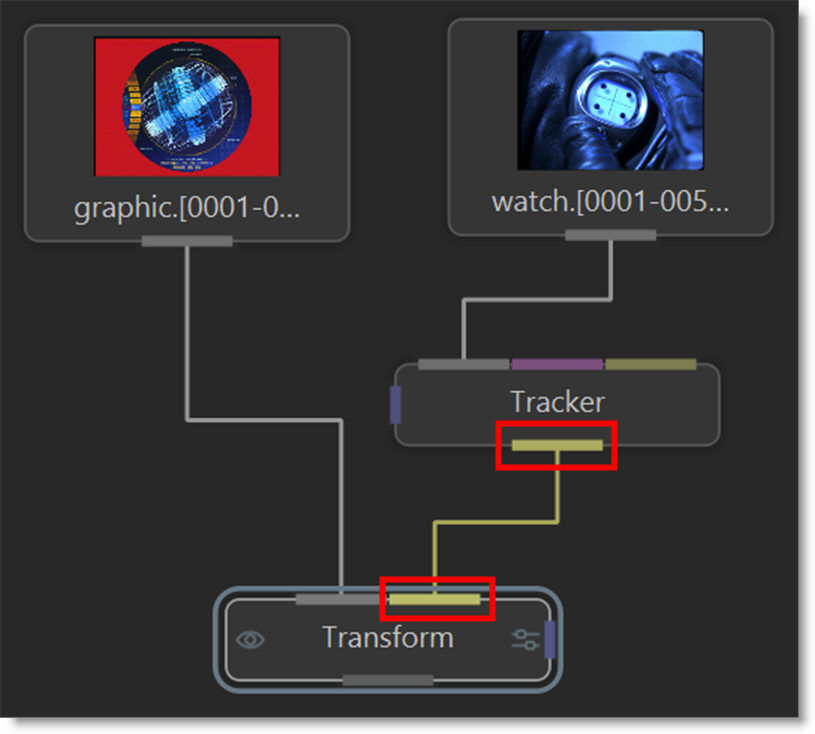
4 Single-click in the center of the Tracker node to view and edit it.
5 Track an object and apply the tracker to a layer.
6 Single-click in the center of the Transform node to view and edit it.
7 Select a point tracker or tracked layer from the Transform > Transform pop-up menu.
8 Choose Match Move in the Transform > Mode pop-up menu.
The tracking data from the selected layer is applied to the image and it is match moved.
9 If necessary, you can use the Transform node’s parameters in conjunction with the tracking transform.
Inserts
Inserts are achieved using the Transform node. When the Data output of a Roto, Tracker, Mocha Pro or SynthEyes node is plugged into the Transform node’s Data input, the layer surface or card’s corner points are used to set the insert corner-pin.
Note: When using a tracked card from the SynthEyes node as the insert source, the tracking steps below are not necessary.
1 In the Trees window, add a Transform node from the Nodes > Transform group and connect it to the source node.
2 Drag a Tracker node from the Nodes > Transform group onto the source node.
A new branch is created.
3 Connect the Tracker’s Data output into the Transform node’s Data input located at the top right of the node.
4 Single-click in the center of the Tracker node to view and edit it.
5 Track an object and apply the tracker to a layer.
6 Select Transform mode and then the Viewer > Surface icon.
The Surface icon displays the selected layer’s surface when in Transform mode. By default, the Surface is set to the corners of the layer.
7 Adjust the Surface corner points with the on-screen controls to match where the insert should be placed.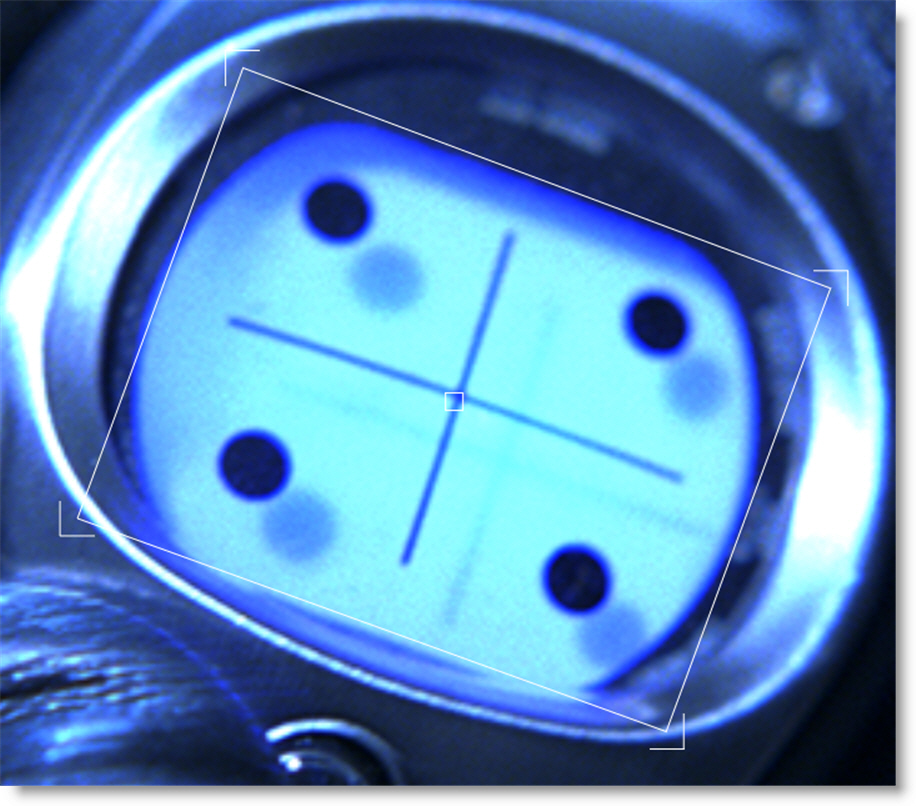
Note: The color of the Surface on-screen controls is blue by default.
8 Single-click in the center of the Transform node to view and edit it.
9 Select Insert in the Transform > Mode pop-up menu.
10 Select the tracked layer from the Transform > Surface pop-up menu.
11 Replace the Transform input with the insert source.
12 Use a Composite node to combine the transformed insert and background.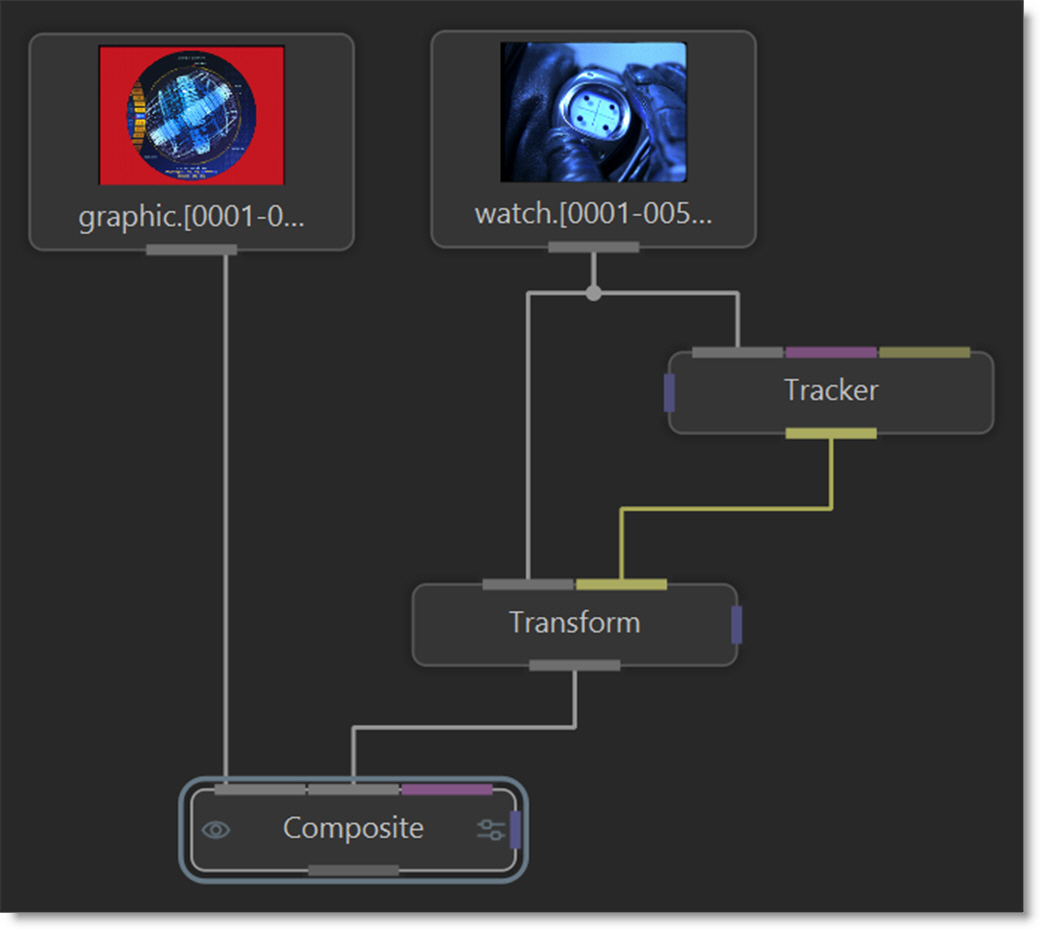
The Layer’s Surface corner points are used to set the insert corner-pin.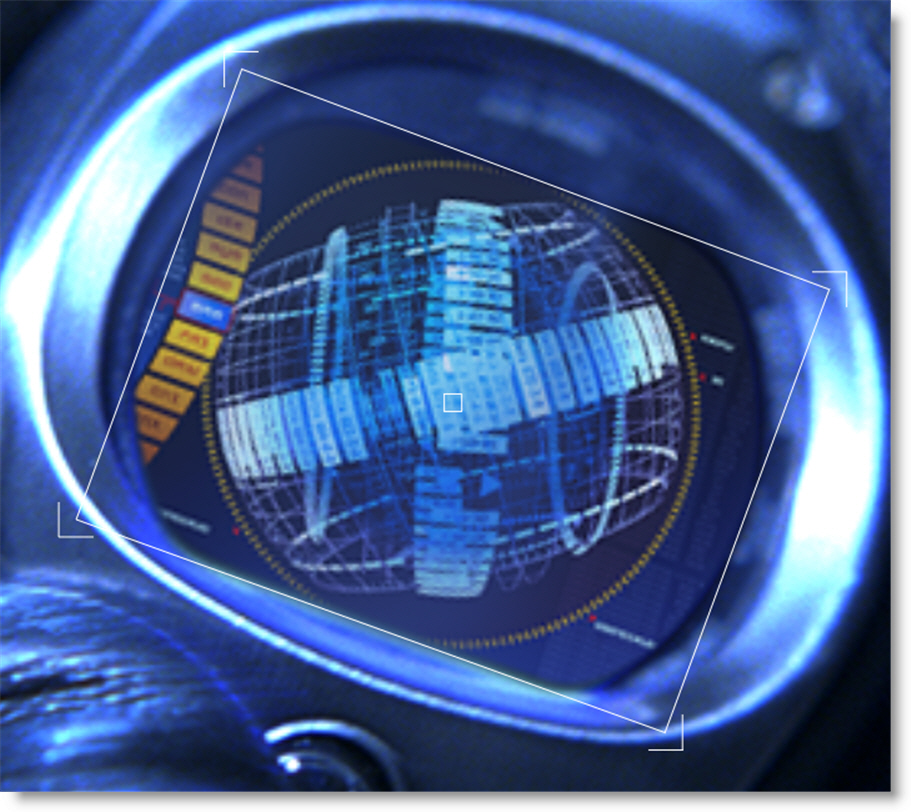
Point Control Tracking With Data Ports
Point control parameters can be match moved. This is achieved by plugging the Data output of a Roto, Tracker, Mocha Pro or SynthEyes node into another node’s Data input. When either a layer, point tracker, or card is selected in the Transform pop-up menu to the right of the point control, the parameter is match moved.
Note: When using a tracked card from the SynthEyes node as the transform source, the tracking steps below are not necessary.
1 In the Trees window, add a node that contains a Data input, for instance, Light > Lens Flare.
2 Drag a Tracker node from the Nodes > Transform group onto the source node.
A new branch is created.
3 Connect the Tracker’s Data output into the Lens Flare node’s Data input located at the top right of the node.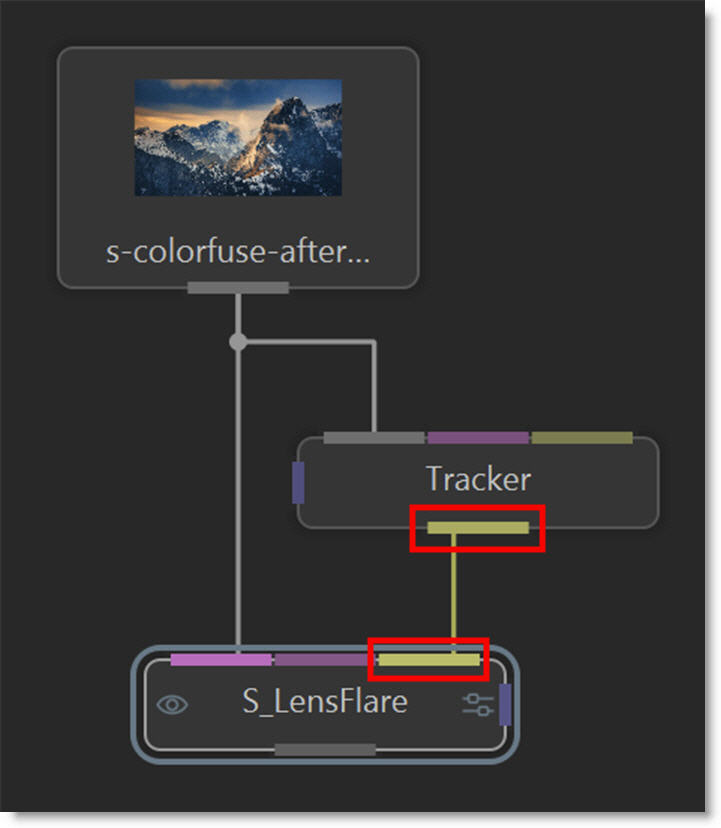
The Data ports are colored yellow.
4 Single-click in the center of the Tracker node to view and edit it.
5 Track an object and apply the tracker to a layer.
6 Single-click in the center of the Lens Flare node to view and edit it.
7 Select a layer, point tracker, or card from the Transform pop-up menu to the right of the Flare > Position parameter.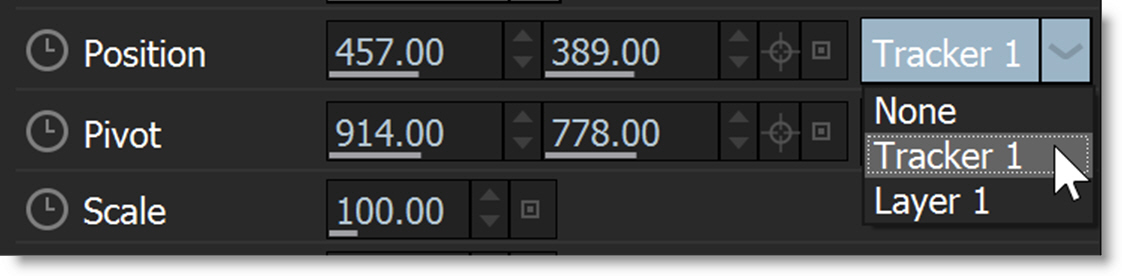
8 Drag through the sequence.
The Position parameter is now match moved to the selected point tracker or tracked layer.
Importing and Exporting Tracking Data
Exporting Tracking Data
Trackers can be exported to the After Effects, Autodesk, Nuke and Shake tracker formats. In addition, the tracking data applied to a layer, either by point trackers or planar trackers, can be exported as a four point corner-pin track.
Note: Mocha tracking data can not be exported as external trackers.
Exporting One to Two Trackers
1 Choose the Tracker (Shift-T) in the Roto Toolbar.
2 Click on the Point tab.
3 Select the trackers that you want to export.
4 Choose Export in the Tracker tab and select the tracker format.
5 When the window pops up, type in a name and click Save.
Currently, you can export to the After Effects, Autodesk, Nuke and Shake tracker formats.
Exporting Four Trackers for Corner-Pinning
1 Choose the Tracker (Shift-T) in the Roto Toolbar.
2 Click on the Point tab.
3 Select the trackers:
• After Effects, Nuke and Shake: Using the Shift key, select the four trackers that you want to export in a Z pattern in the Viewer: Upper Left, Upper Right, Lower Left and Lower Right.
• Autodesk Flame: Using the Shift key, select the four trackers in the following order in the Viewer: Bottom Left, Top Left, Bottom Right, Top Right.
4 Choose Export in the Tracker tab and select the tracker format.
5 When the window pops up, type in a name and click Save.
Exporting a Layer as a Four Point Corner-Pin
1 Select the layer that you want to export.
2 Press the Tracker (Shift-T) in the Toolbar, Choose Export in the Tracker tab and select the tracker format.
3 When the window pops up, type in a name and click Save.
Note: When exporting a four point corner-pin track to Autodesk products, it is better to use four trackers instead of the tracking information from a layer.
Export Surface Corner Points As Trackers
Layers can optionally have Surface corner points set which can then be converted to Point trackers for export.
1 Select a tracked layer.
2 Click Transform mode and then the Viewer > Surface icon.
The Surface icon displays the selected layer’s surface when in Transform mode. By default, the Surface is set to the corners of the layer.
3 Drag the Surface corners to the desired locations.
4 Select the Tracker (Shift-T) in the Roto Toolbar.
5 Choose the Point Tracker tab.
6 Right-click in the Viewer and select Create Corner Trackers from Layer Surface.
Four point trackers appear on the layer’s surface corners.
7 Proceed to export the four trackers as outlined in Exporting Four Trackers for Corner-Pinning.
Importing Tracking Data
Mocha Pro, After Effects Corner-Pin, Nuke 8 and above, Shake or Simple Format formatted trackers can be imported into Silhouette. If you would like to import trackers from non-supported applications, simply export a Silhouette tracker in Simple Format to see how it should be formatted.
Silhouette
Import Menu
1 Select the Tracker (Shift-T) in the Roto Toolbar.
2 Choose Import in the Tracker tab.
3 Select the Mocha Pro, After Effects Corner Pin, Nuke, Shake or Simple Format tracker file that you would like to import and click Open.
If you select multiple trackers in the import dialog, more than one tracker can be imported at a time.
Note: With some formats, the imported trackers may not line up with the tracked feature. If so, use MultiFrame mode to move the tracker and its keyframes into the proper location.
Mocha Pro
1 If you used Copy to Clipboard when exporting to Silhouette Corner Pin in Mocha Pro, you can paste the trackers into a Silhouette Roto node.
2 Mocha tracked layers can also be brought into Silhouette using the Mocha Pro node’s Action menu. This menu creates a Tracker node from the Mocha Pro project without having to go into the Mocha UI.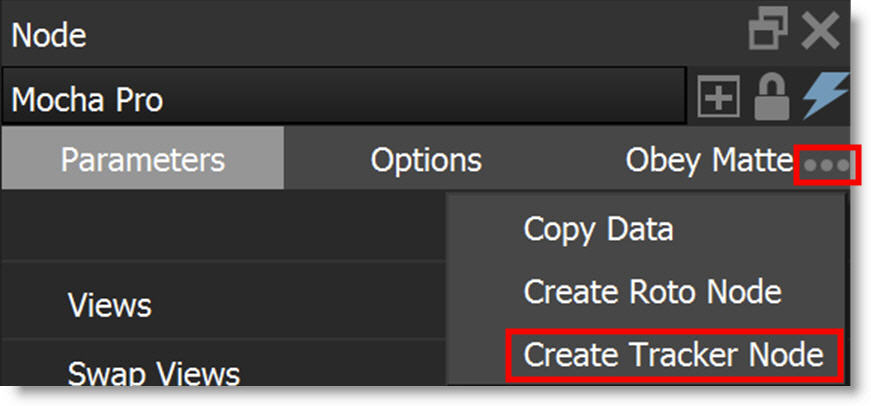
After Effects
1 Double-click on the tracker text file that you exported from Silhouette.
The value of the Comp Pixel Aspect Ratio line at the top of the exported tracker file must match the Pixel Aspect Ratio in the After Effects Composition settings. Edit the exported tracker file as needed.
2 Press Ctrl/Cmd-A to select all and Ctrl/Cmd-C to copy.
3 In After Effects, select a layer in the Timeline and press Ctrl/Cmd-V to paste the Tracker Data.
Note: If you exported a limited work range in Silhouette, go to the start frame of the work range in After Effects before pasting.
4 Open the Window > Tracker controls.
5 In the Motion Source pop-up, select the layer where you pasted the tracking data.
6 From the Current Tracker pop-up, select the Tracker that you just pasted. If you only have one tracker, this would be Tracker 1.
7 Change the Track Type from Raw to one of the available options.
8 Click Edit Target and choose the layer that you would like to apply the motion to.
9 Hit Apply.
Flint / Flame / Inferno
1 Select the Stabilizer.
2 Click on the Imp button below the Track fields and select the tracker file that you saved from Silhouette.
Note: When importing a four point corner-pin track in Flint, Flame and Inferno, it is better to use four trackers instead of the tracking information from a layer.
Nuke
1 Choose File > Import Script and select the tracker file that you saved from Silhouette.
Shake
1 Add a Tracker, Match Move or Stabilize node.
2 In the Tracker node, click the Load button in the Parameter tab and select the tracker file that you saved from Silhouette.
3 For the Match Move and Stabilize nodes, right-click on one of the track names in the Parameter tab and choose Load Track File.
4 Select the tracker file that you saved from Silhouette.